You'll need at least V3.06 Beta version for this sample.
This documentation is about creating a custom package delivery screen configuration. Before start reading this long document I highly reccomend you watching usage video of this sample to better understanding what is it about. http://youtu.be/ljXkrkhuz3g . Video is in Turkish Language but you can enable English Subtitles.
SambaPOS have lots of features for running your package delivery business. With V3 you can even do more by using automation features and custom screen widget. This sample will demonstate:
- Receving orders by using Caller Id module.
- New orders will receive "Waiting Status" and listed on a table.
- We'll display orders by customer regions.
- We can multi select waiting orders and assign them to a delivery personnel with a single click.
- Listing tickets by Deliverers and settling them.
We'll start by creating a new Entity Type for deliverers. We'll have two custom fields for personnel phone and address. You can add more for your needs by right clicking on the grid. Creating a Deliverer Entity Type means we can create Deliverers and assign them to tickets like we assign customers or tables.
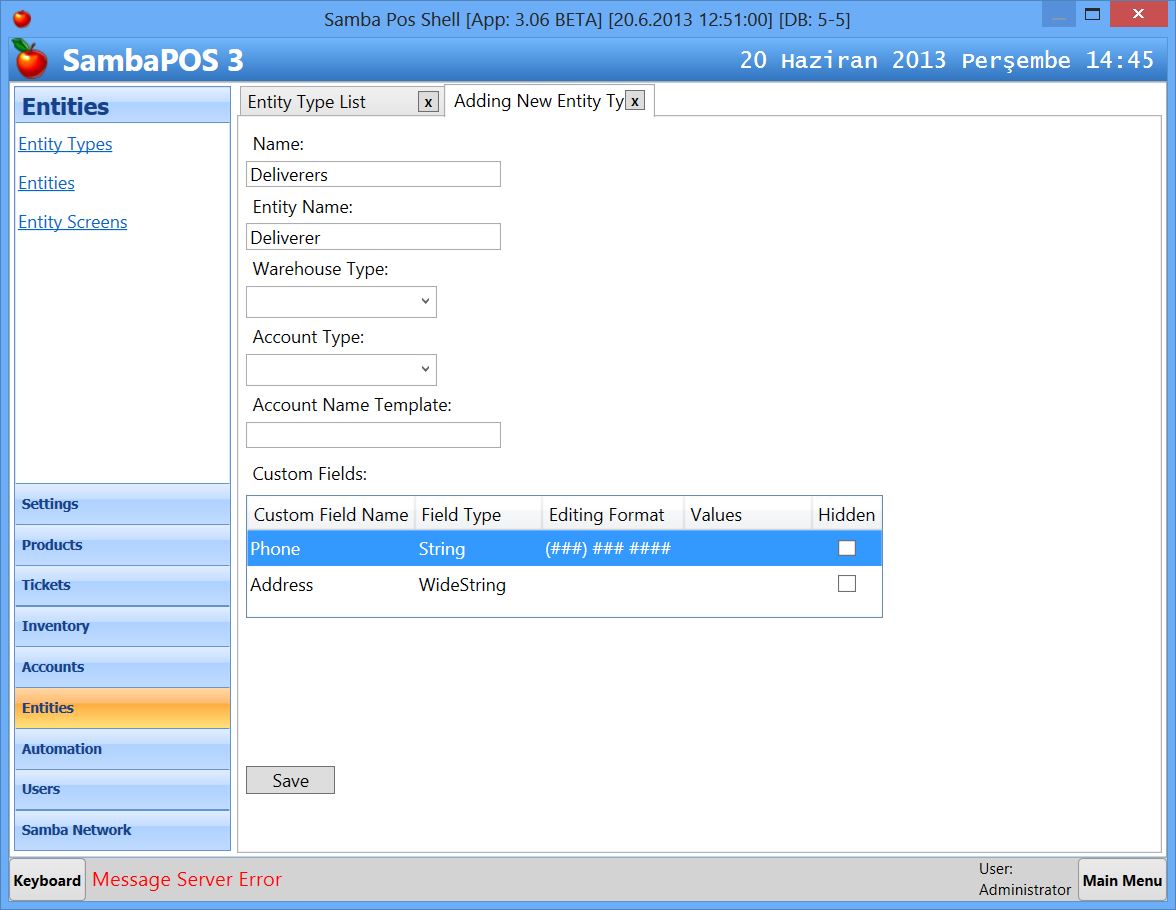
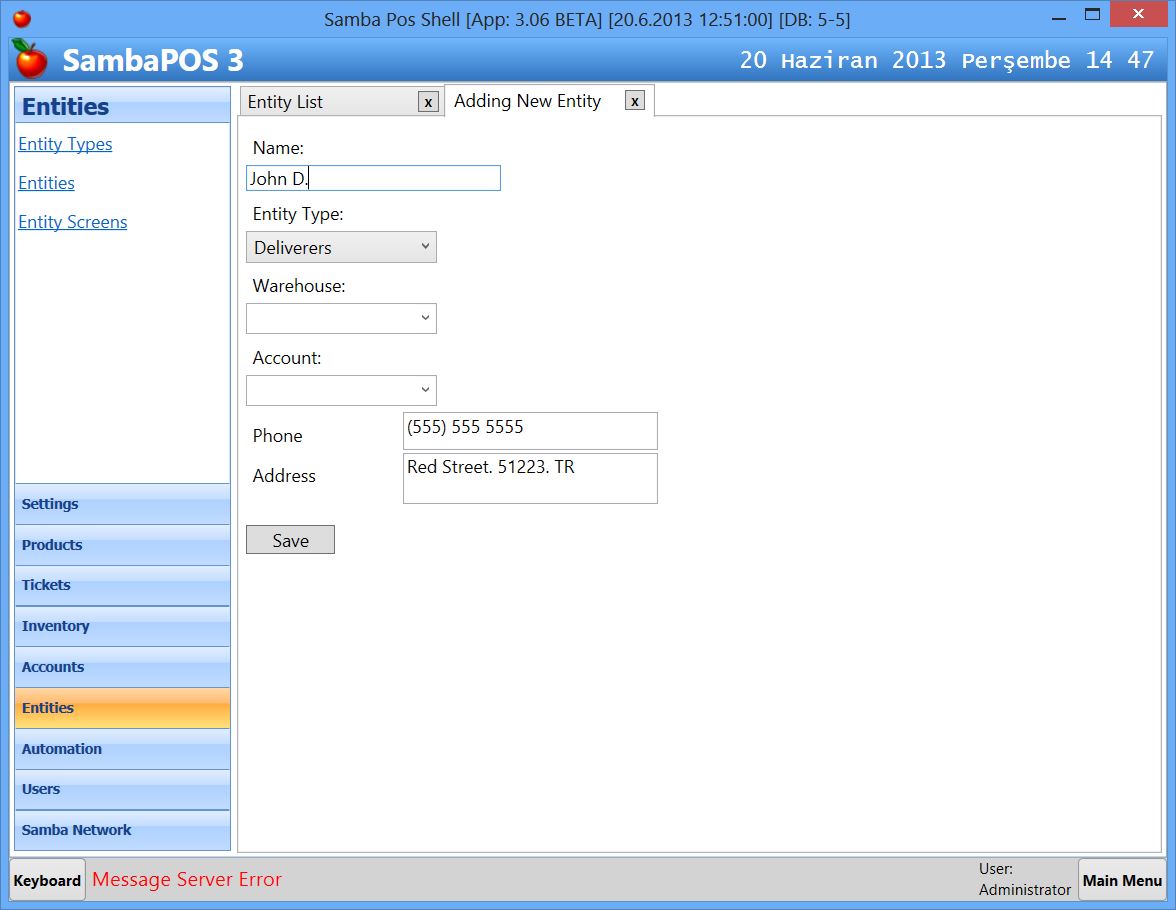
While creating delivery personnel records we can update custom fields.
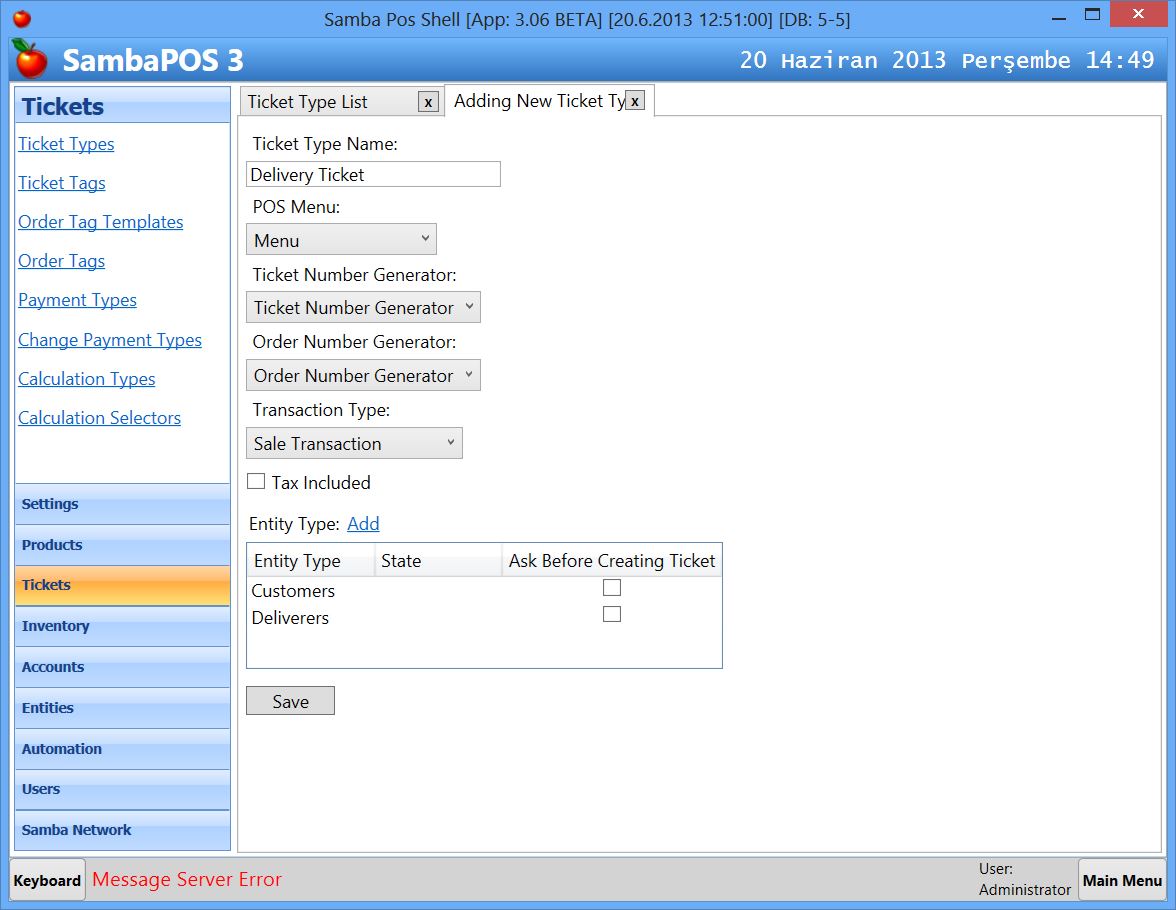
We'll need different ticket type for delivery department. We'll use same menu for delivery and table service departments but you can create different menu with different prices for delivery department if you need. The main reason we need different ticket type is we can differ delivery sales on reports and make finer configuration. While creating this ticket type we'll assign "Customers" and "Deliverers" entity types to this ticket type. This also means we won't use tables with these tickets. Not in the scope of this document but as a side note you can create custom Transaction Type for this ticket type and differ delivery sales accounts. We'll talk about this more on further documents.
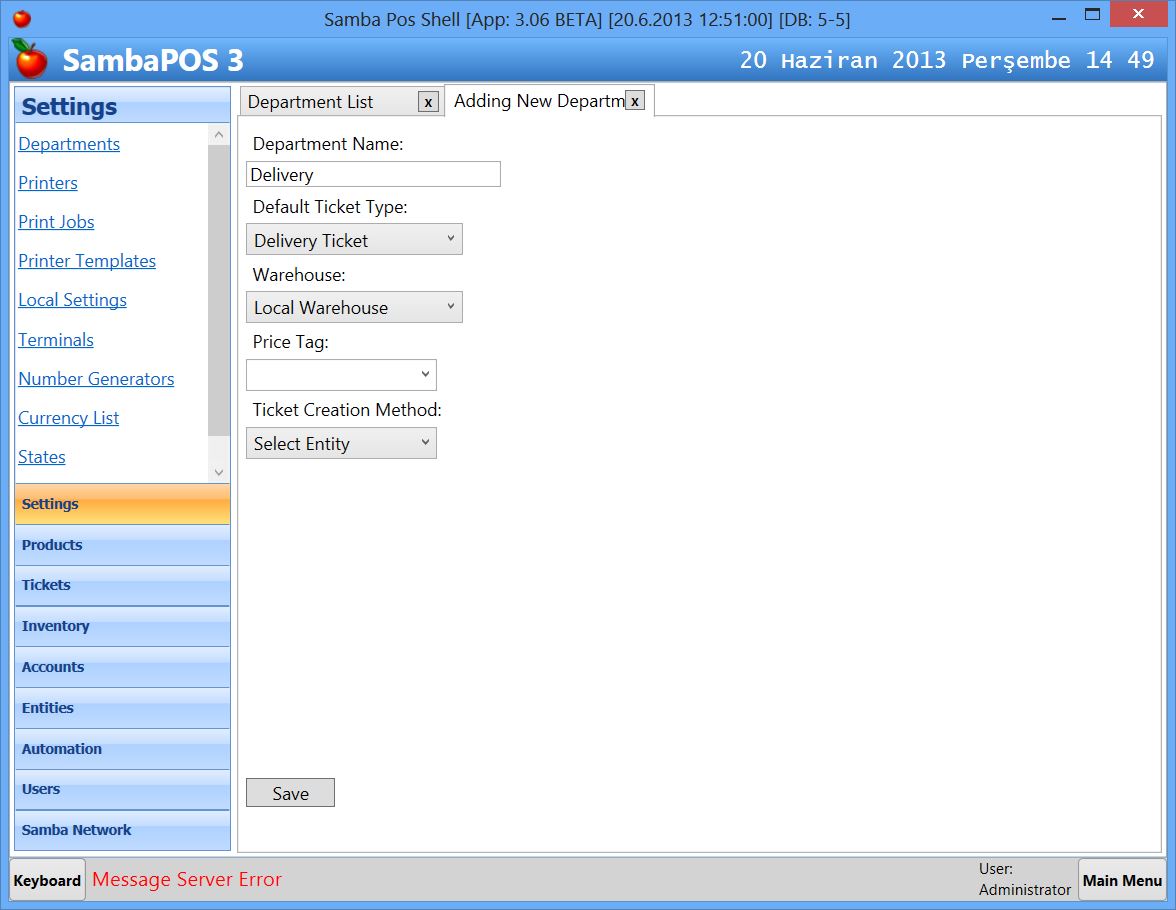
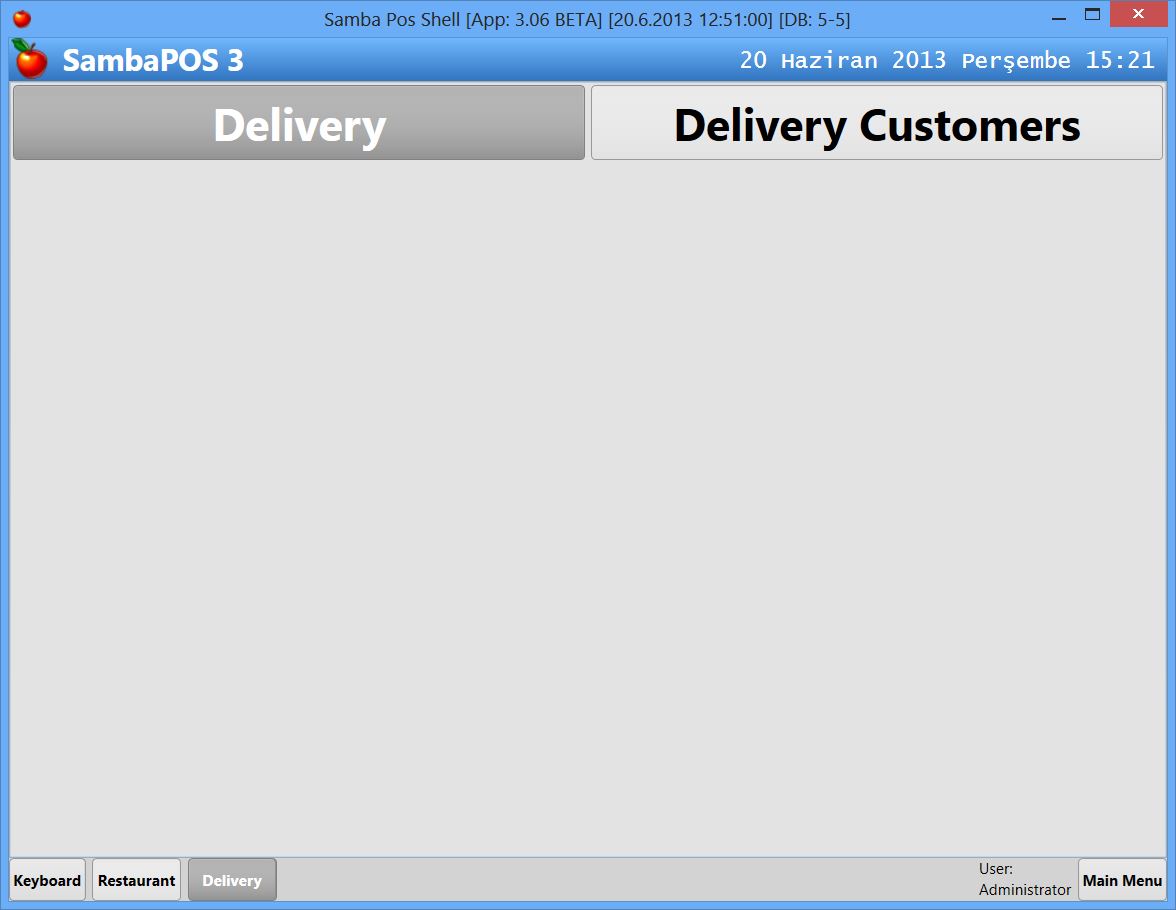
On this step we'll create Delivery Department. We'll choose "Delivery Ticket" as Ticket type so tickets created from Delivery department will use this ticket type.
We'll create a Entity Screen for Delivery department. We'll use two screens for this department. One of them is selecting Customers and the other one is for managing orders. We'll create customer selection screen first. View mode of this screen is "Search" so instead of clicking buttons we'll find customers by typing their name or phone number.
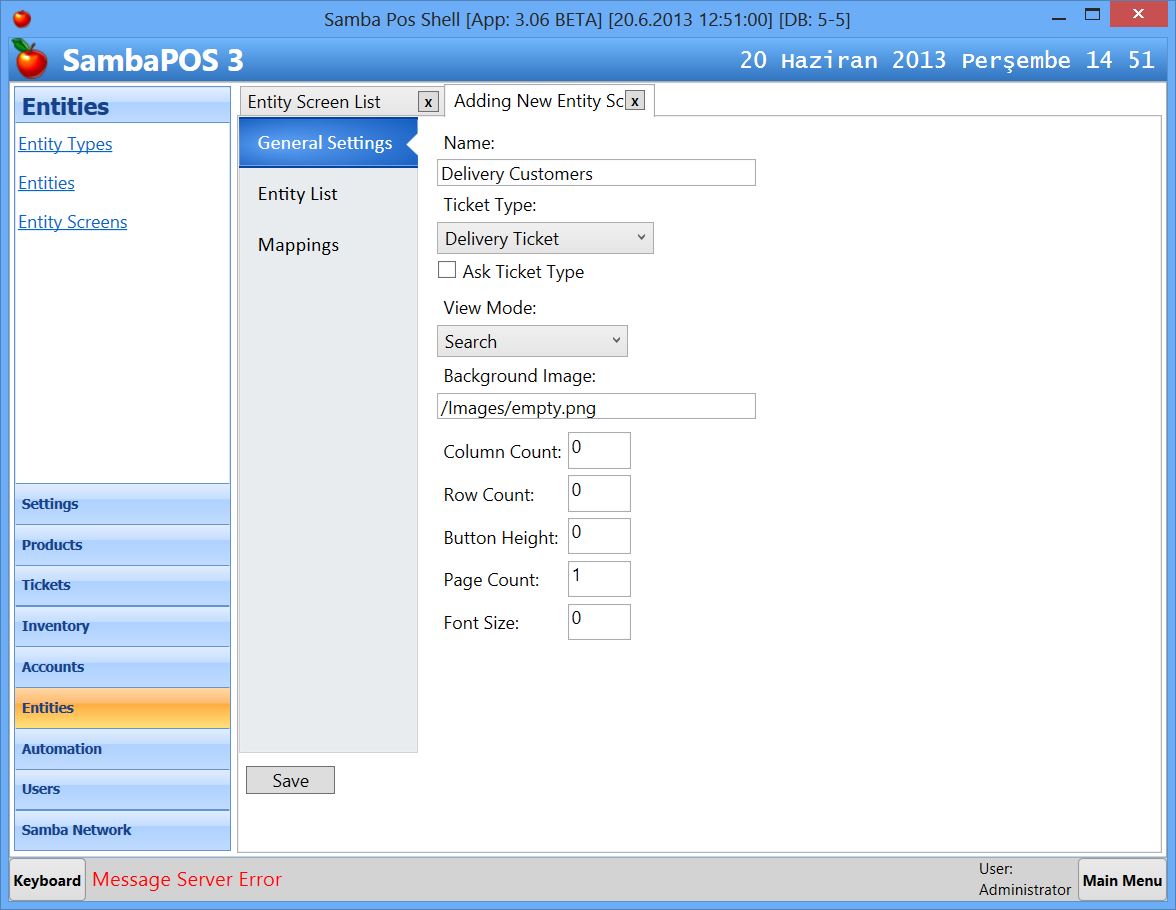
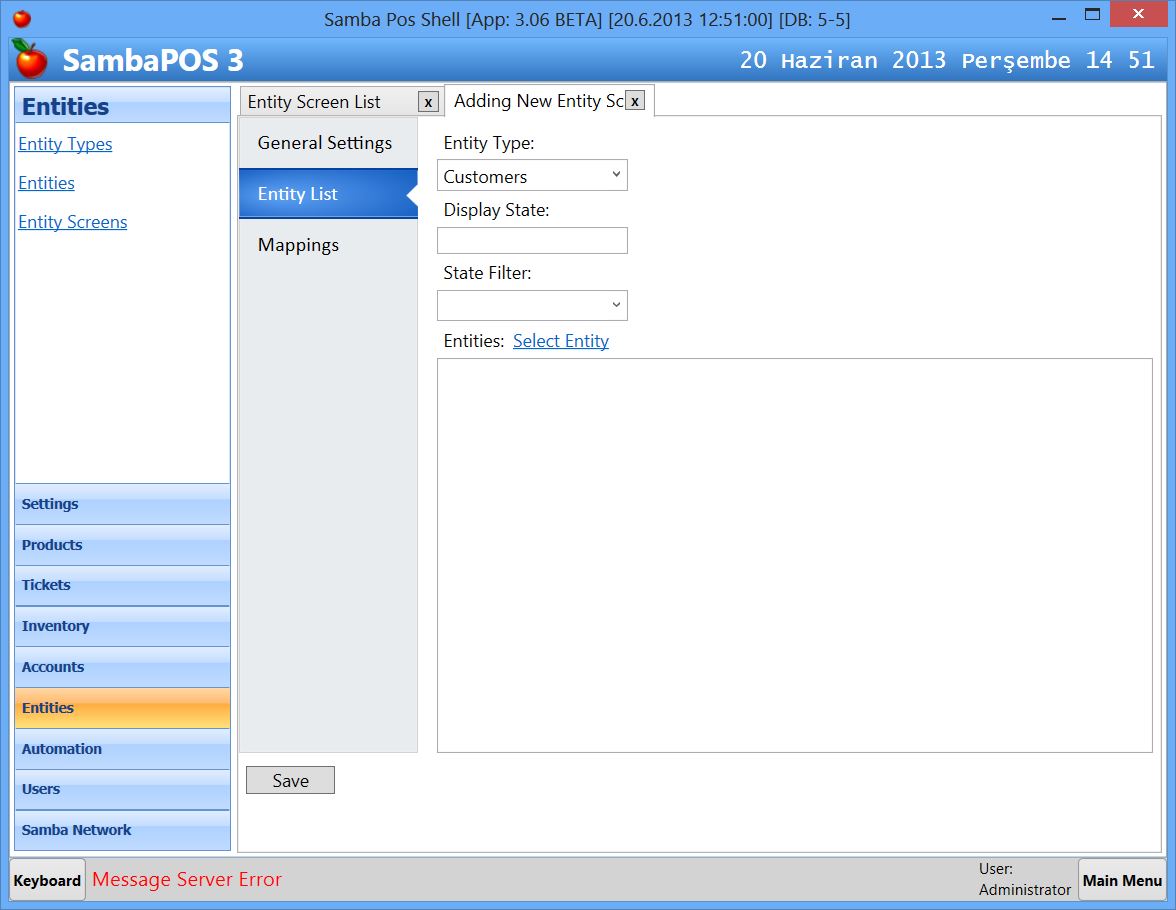
On the Entity List page we'll choose Entity Type of this screen. Since we select Customers here that means we'll find Customers through this screen.
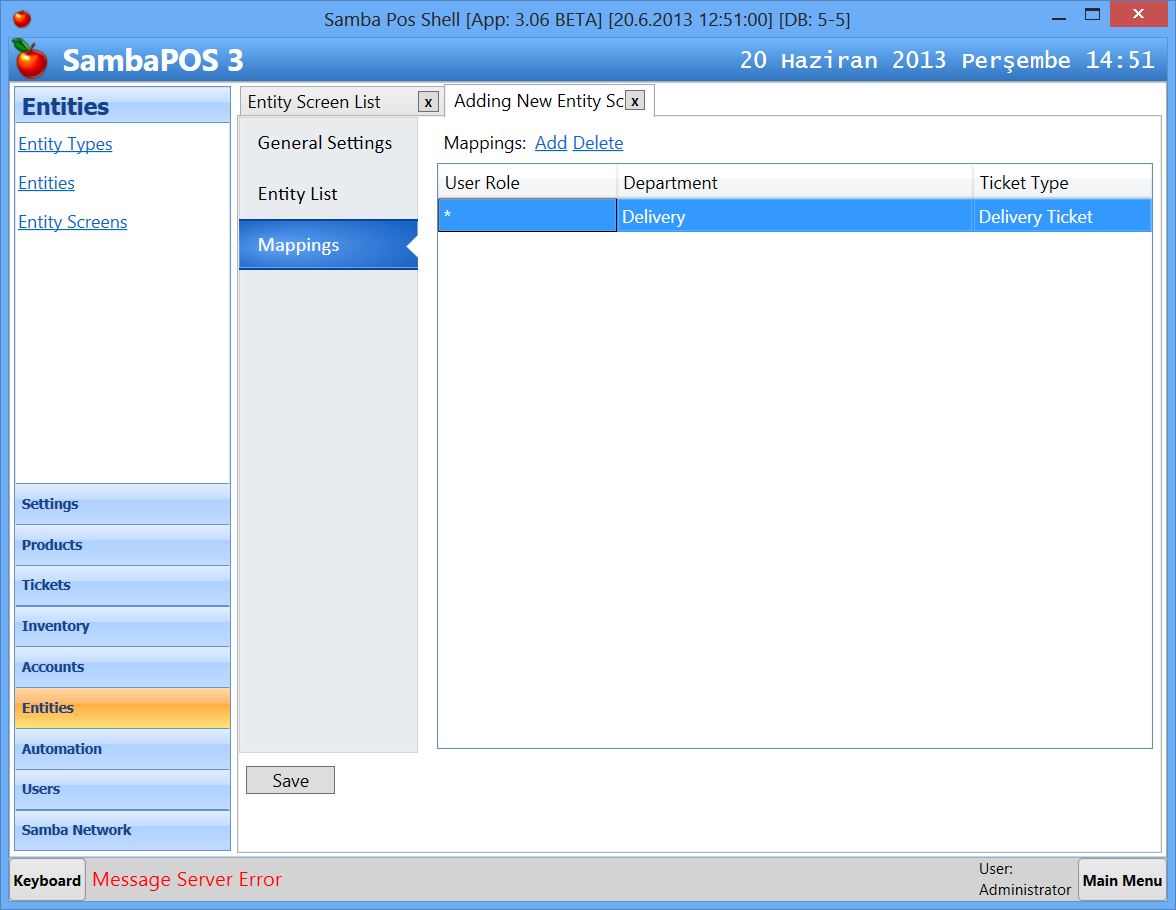
Finally we'll map this screen to Delivery department. That means this screen is visible only for Delivery department. On default configuration Table selection screen is visible to all (*) departments. Since we don't need table selection on Delivery department you can open "All Tables" screen and map it to "Restaurant" department.
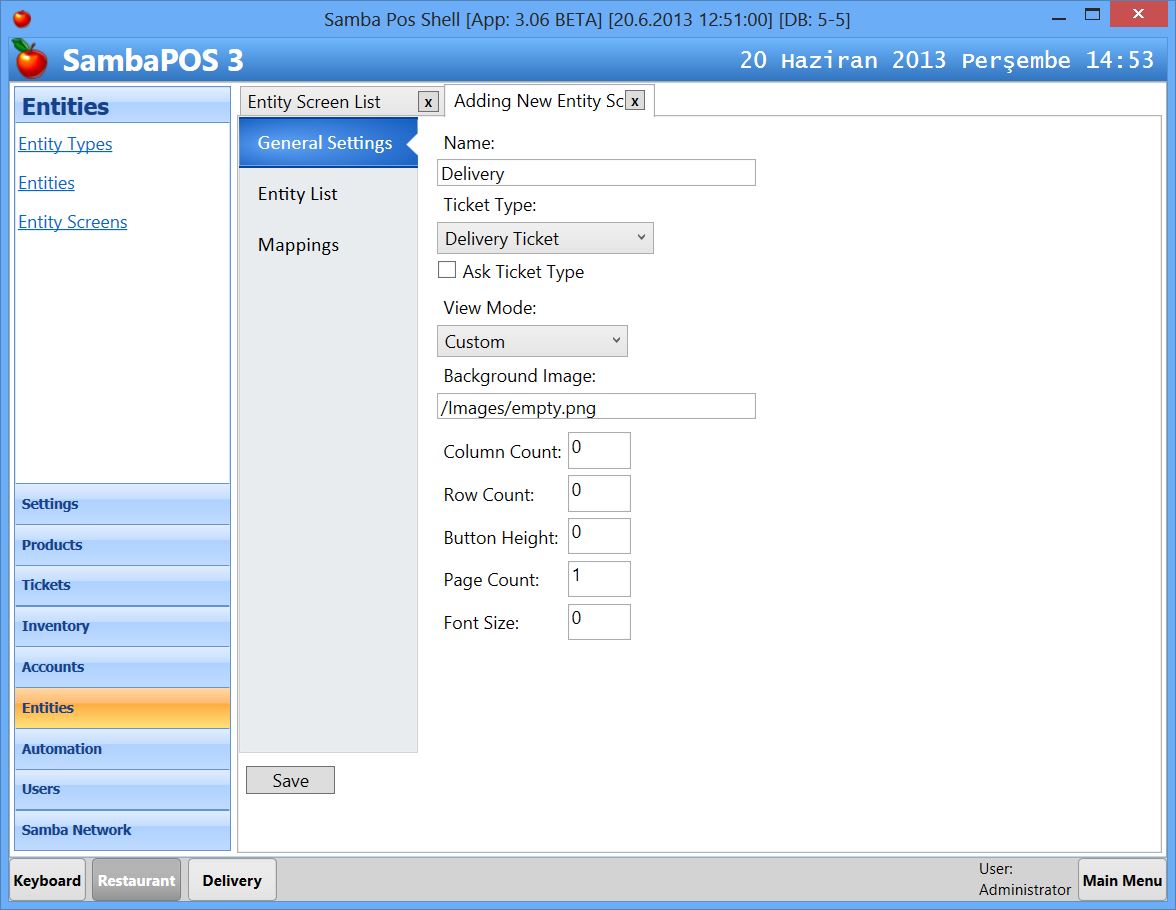
Second Entity Screen is the custom delivery screen we'll configure. We'll add widgets and buttons on this screen like we configure a custom table screen so View Mode should be "Custom"
On the Entity List Page we'll select Entity Type as "Deliverers". That means we'll work with deliverers on this screen. Add previously created delivery personnel to the list and set Display State to "Status" so you can use Resource Grid widget on this screen.

Map it to Delivery department and select Ticket Type as shown here.

When we click "Delivery" department button on the bottom we should see two buttons for two screen we recently created. If you see more screens here it means these screens mapped to all (*) departmens. You can remove them from display by mapping these unneded screens to Restaurant department.
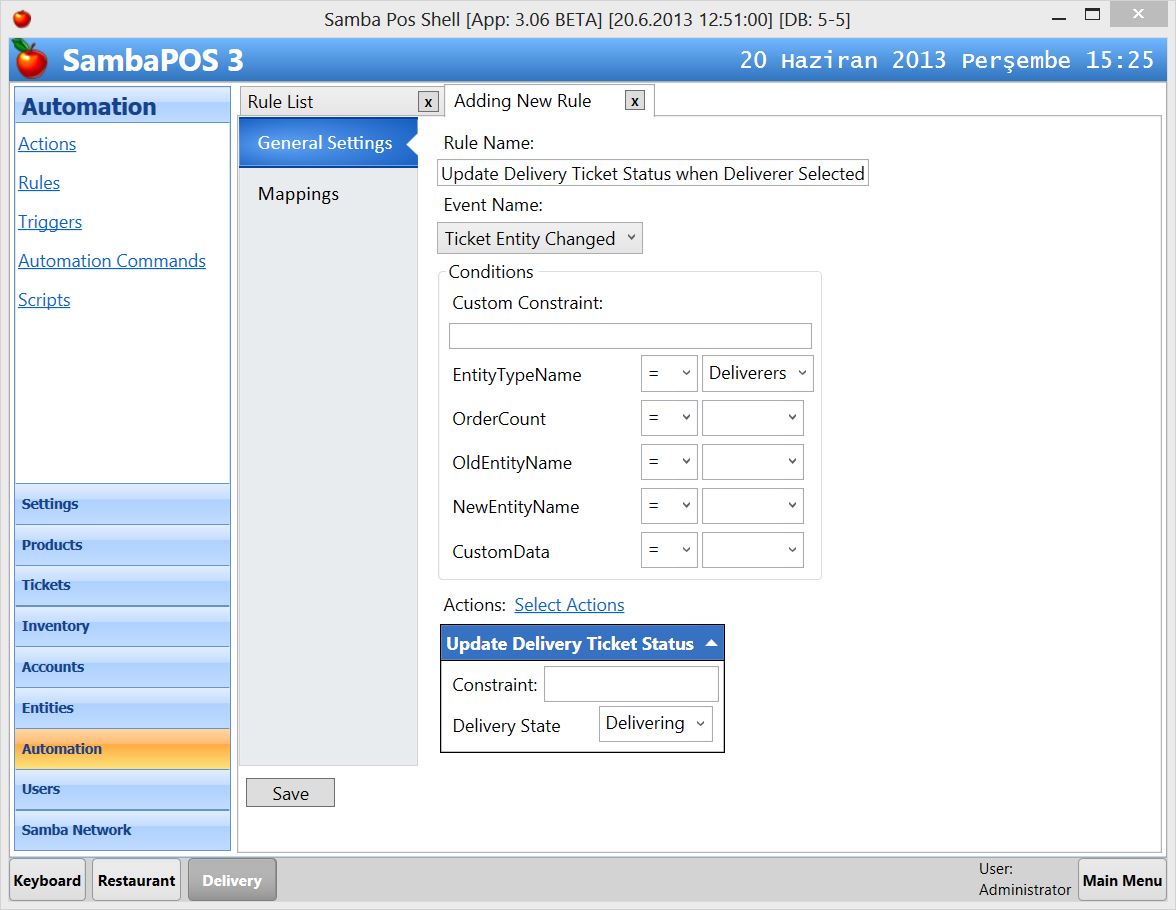
We'll need some rules and actions in order to update states of delivery tickets properly. We'll start by creating an action for updating Delivery Status of the ticket.
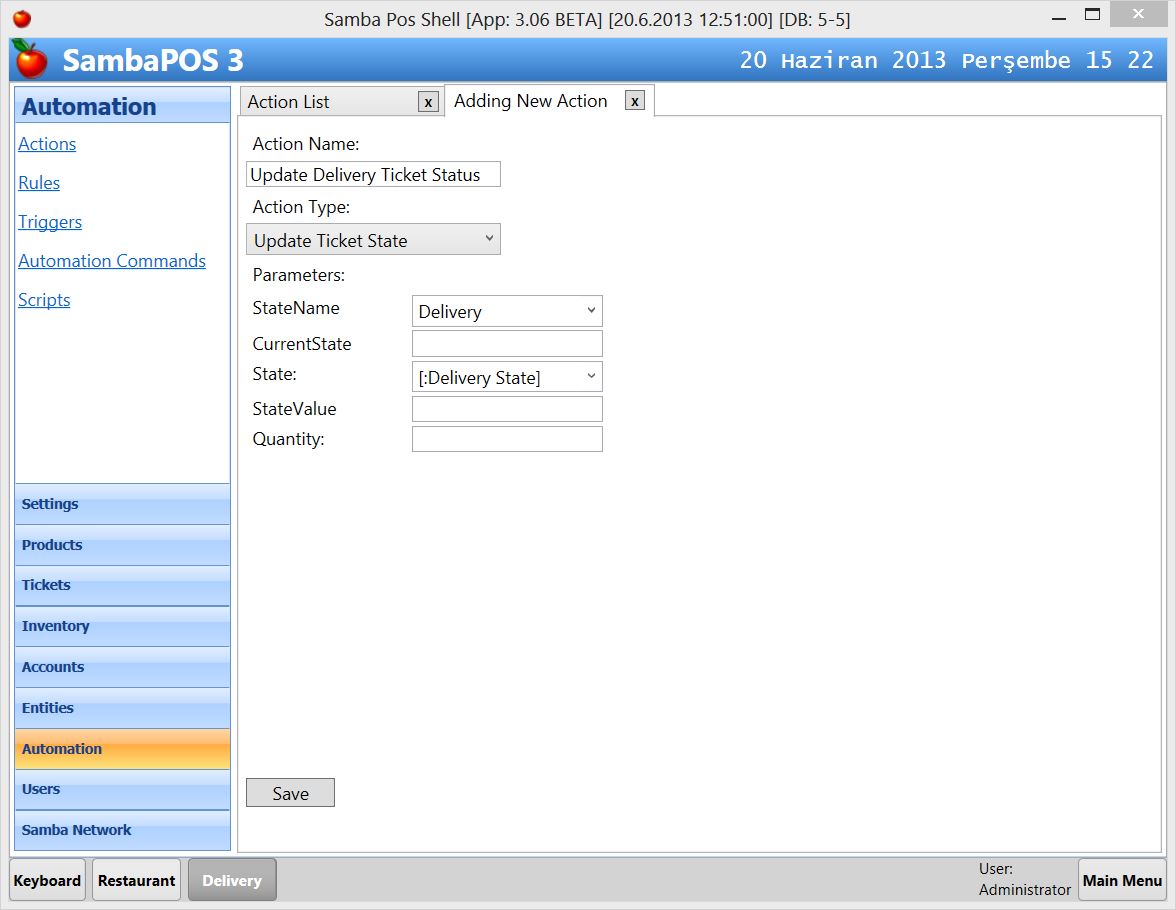
This rule executes "Update Delivery Ticket Status" action with "Waiting" value as soon as a Ticket first Created. That means when we create a ticket it's delivery state becomes "Waiting"
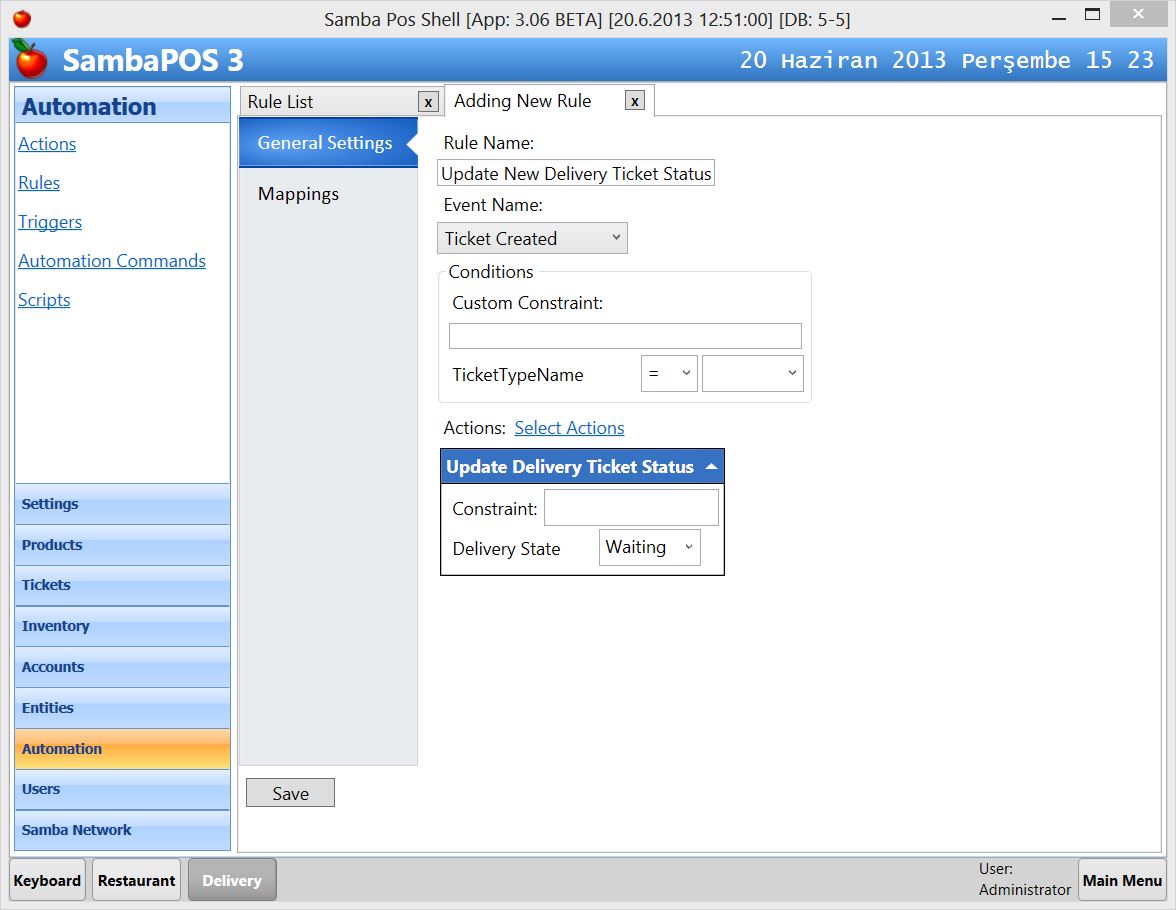
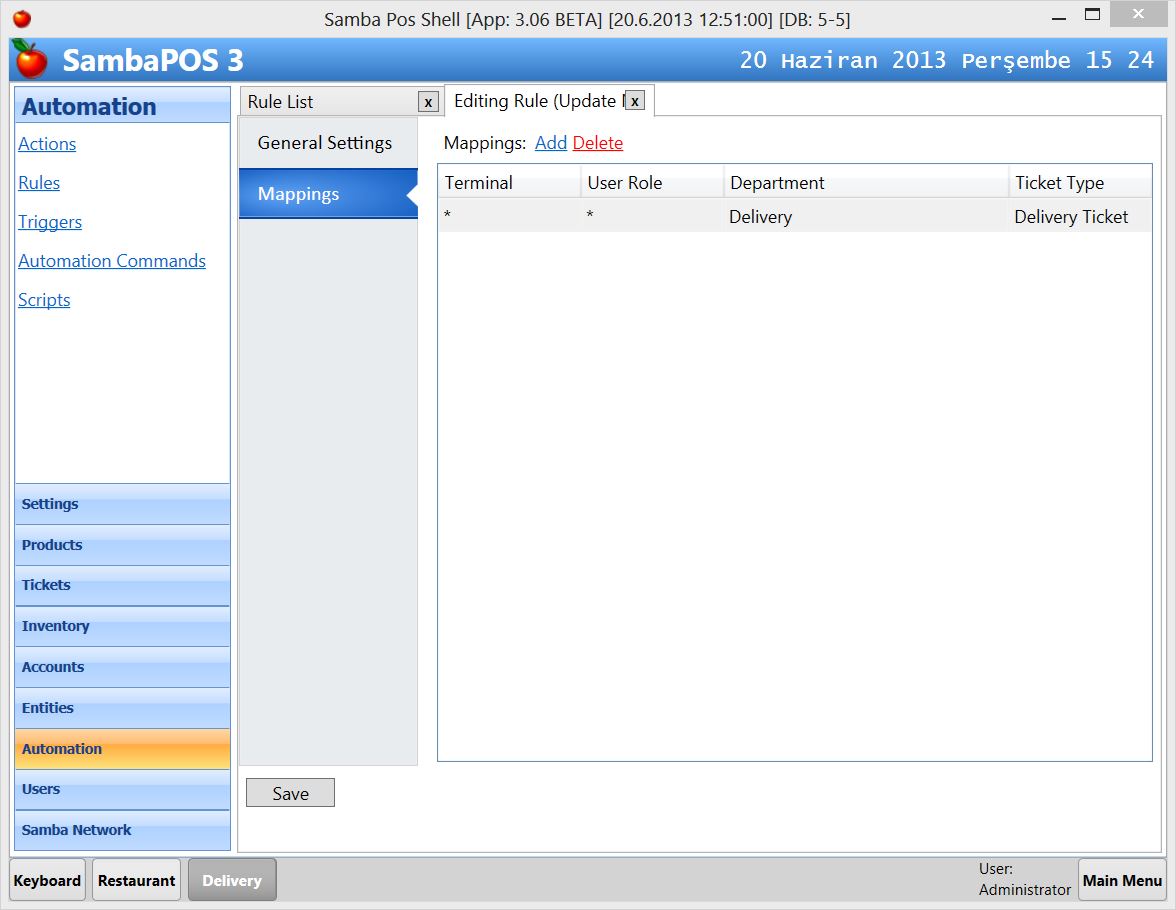
We'll map this rule to delivery department and delivery ticket. So this rule becomes only active for delivery tickets. I won't show this step for every rules we'll create. Please map all further rules to Delivery Department and Delivery Ticket as shown here.
We need another rule to change Ticket Delivery Status to "Delivering" when we assing a Deliverer to Ticket. This rule activates when Ticket Entity Changes and if Entity Type Name equals Deliverers it changes ticket state to "Delivering". You can add more actions here. For example you can print "Delivery Ticket" with deliverer name and customer address.
We'll create another rule to change Ticket Delivery state to "Delivered" when we settle the ticket.
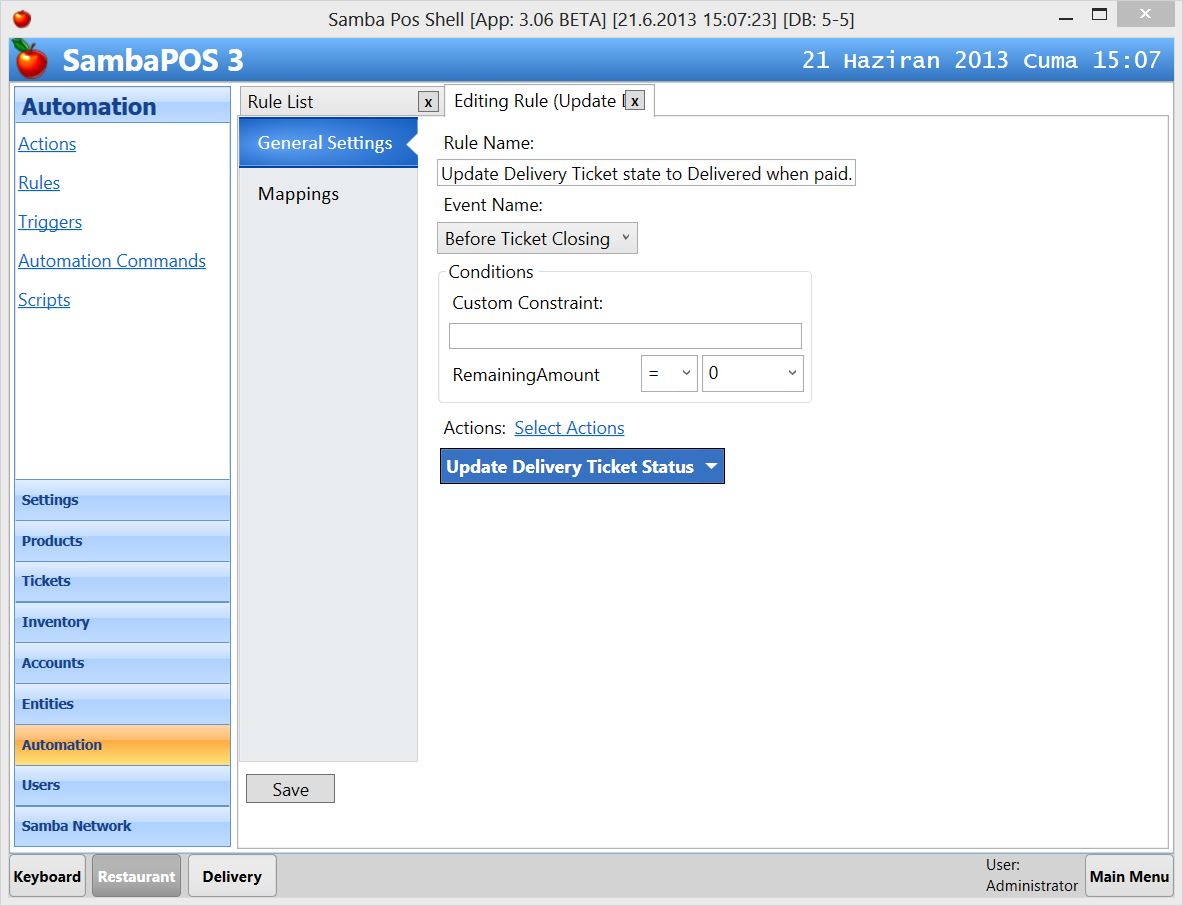
I'm not showing these steps but don't forget mapping these rules to delivery department and delivery ticket.
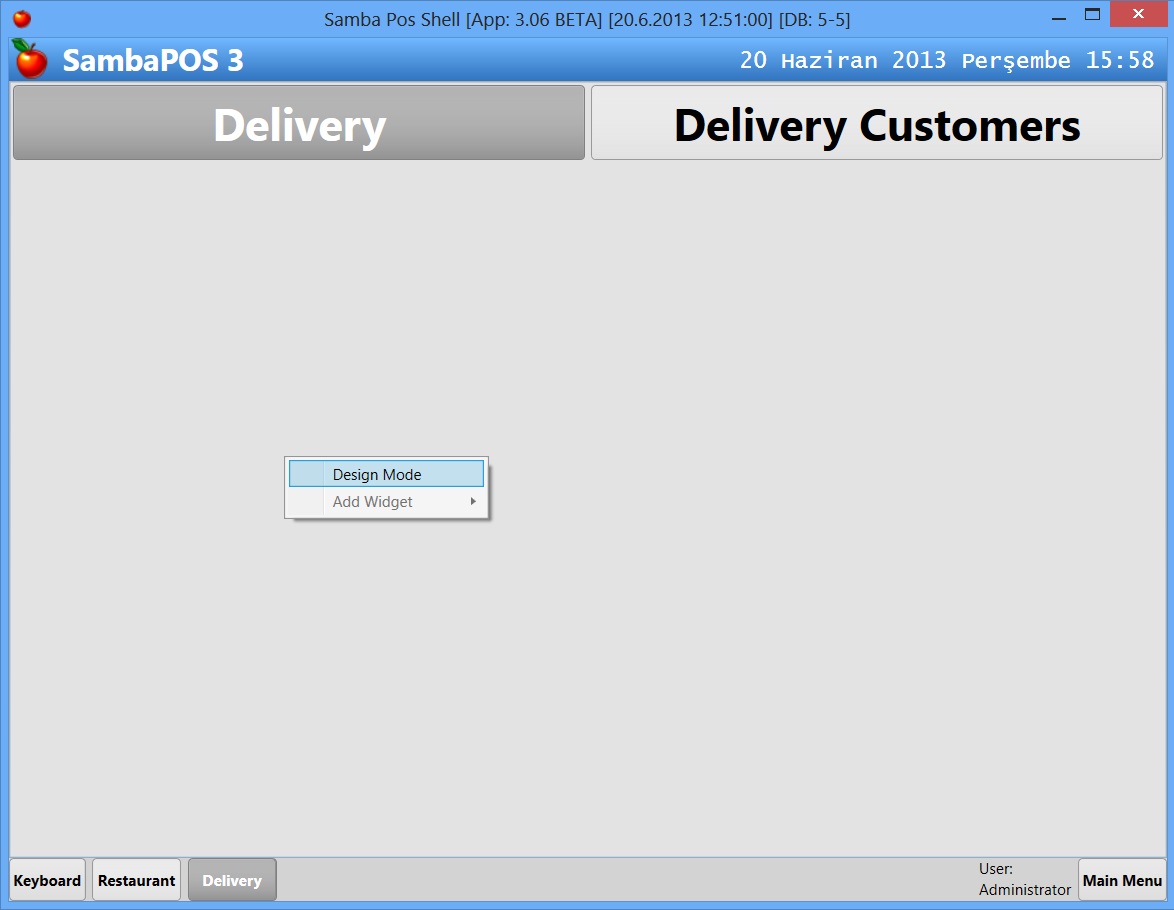
We finished configuring rules for ticket state tracking. Now we'll start desiging Custom Delivery Screen. Switch to delivery screen and enable "design mode" by right clicking on the screen.
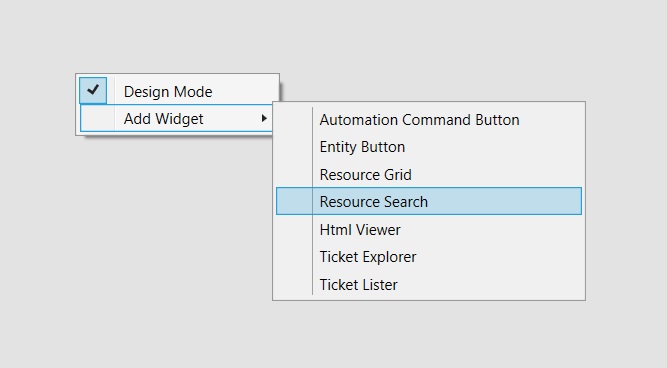
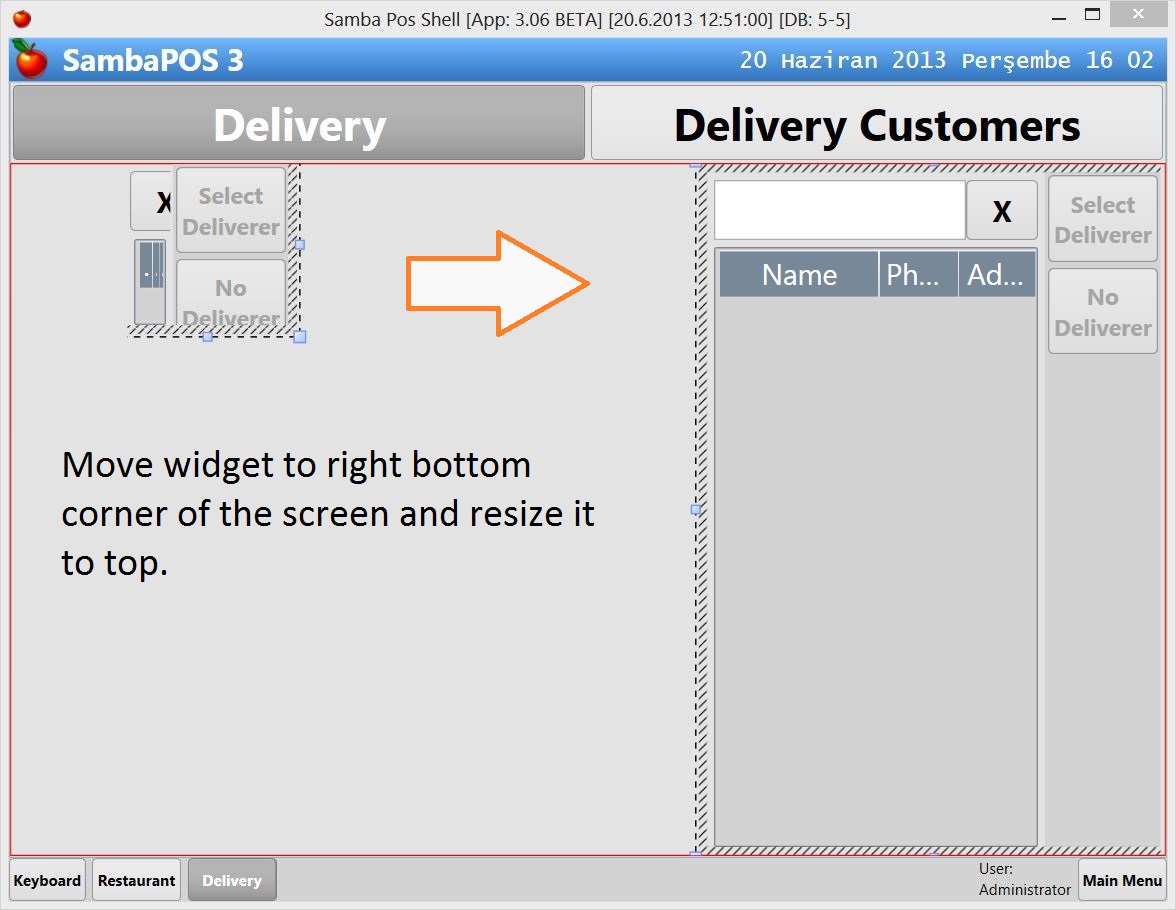
We'll add Resource Search widget.
Move this widget to the right bottom corner of the screen and resize it to the top. It is the easiest way to position widgets. This widget looks like our customer search screens. Since the Entity Type of this screen is "Deliverers" widget automatically configured itself to search deliverer entities.
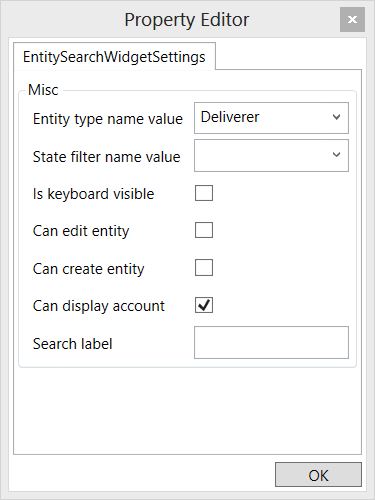
Right click on the widget and click "Settings" We'll configure this widget as displayed here.
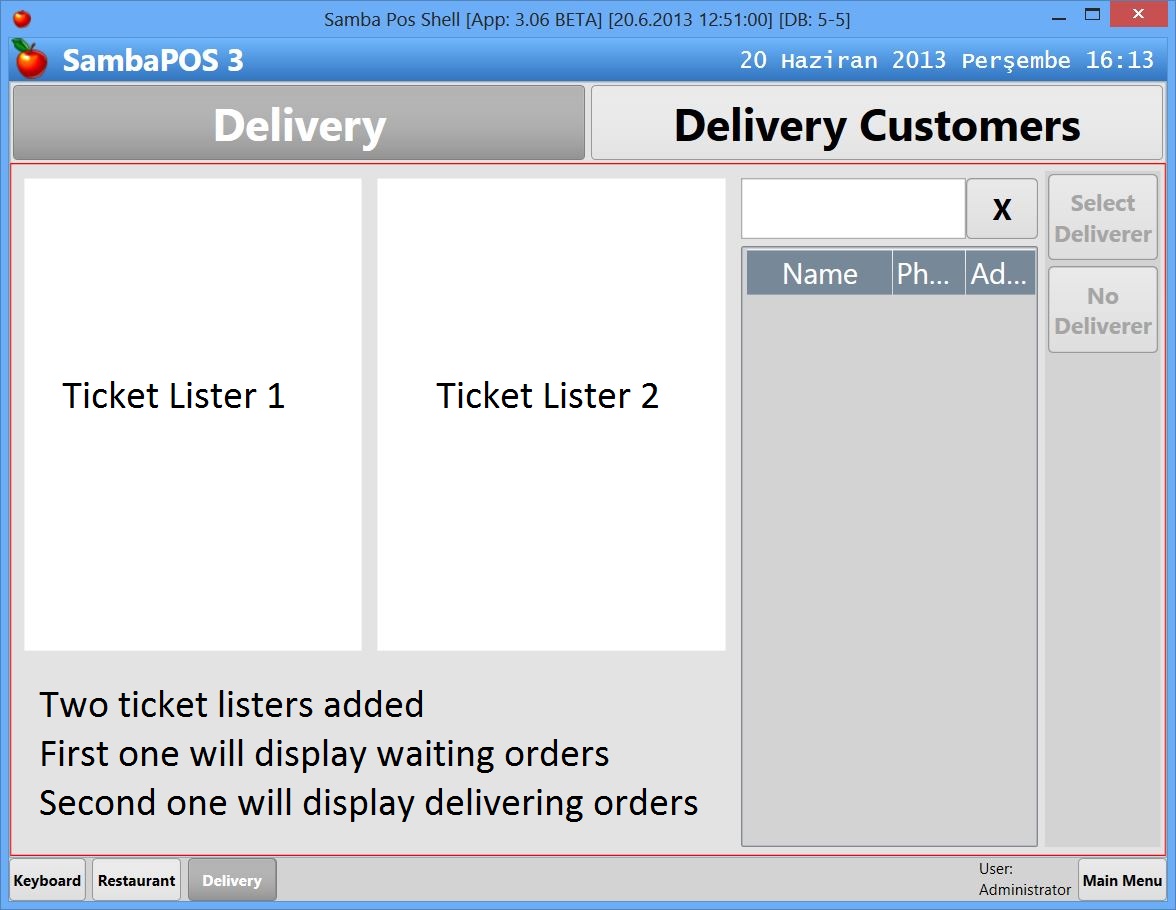
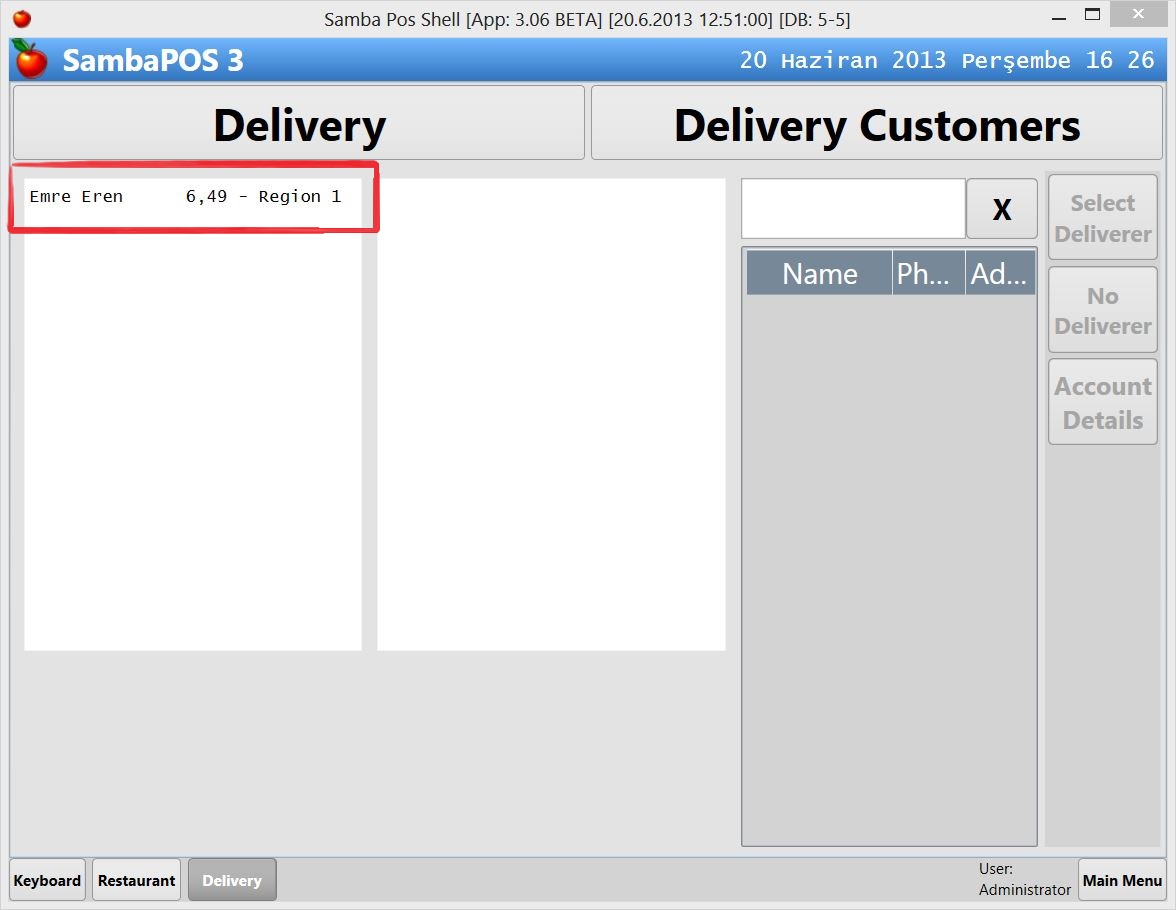
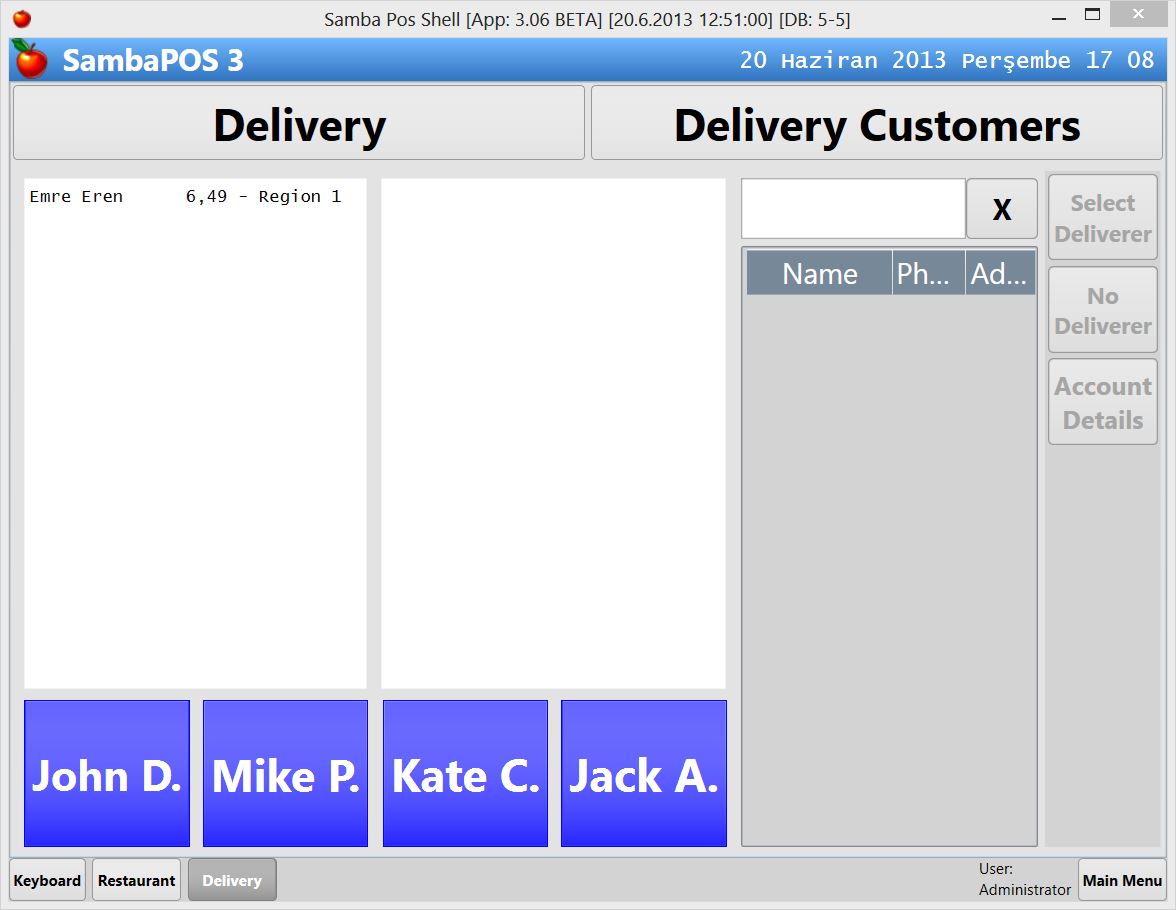
On this step add two Ticket Lister widgets to the screen and position them as displayed here. Ticket Lister is a special widget to list tickets filtered by it's state. Ticket Lister 1 will display "Waiting" tickets and Ticket Lister 2 wil display "Delivering" tickets.
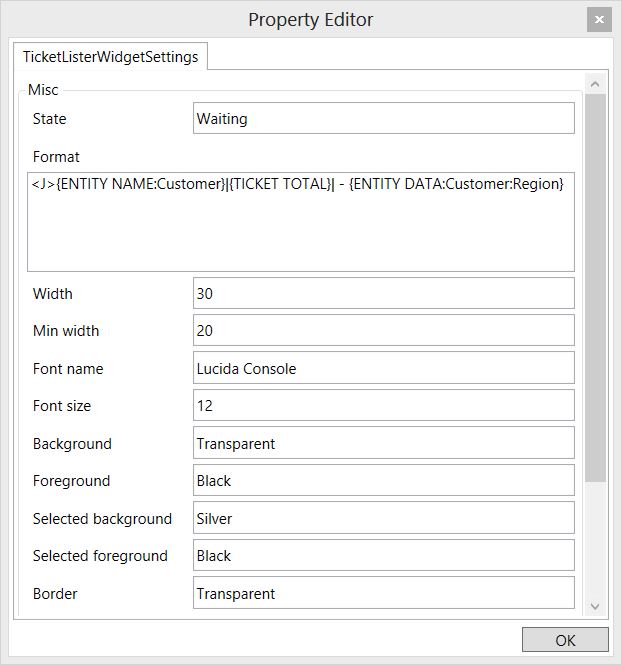
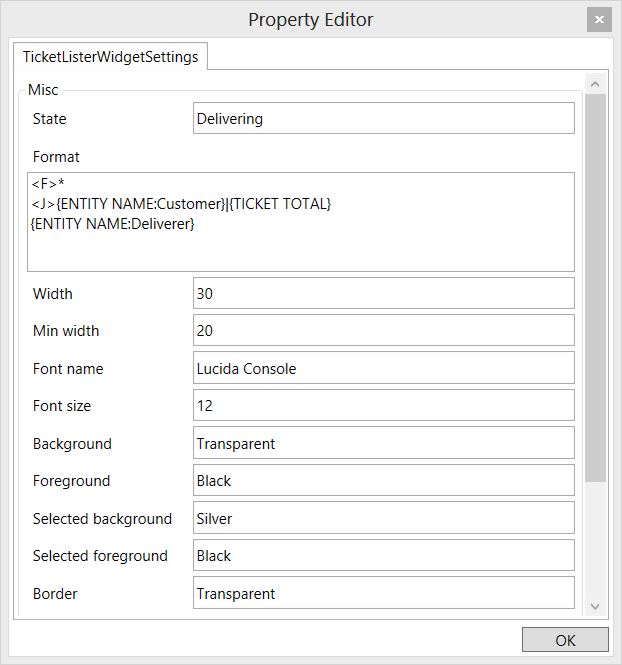
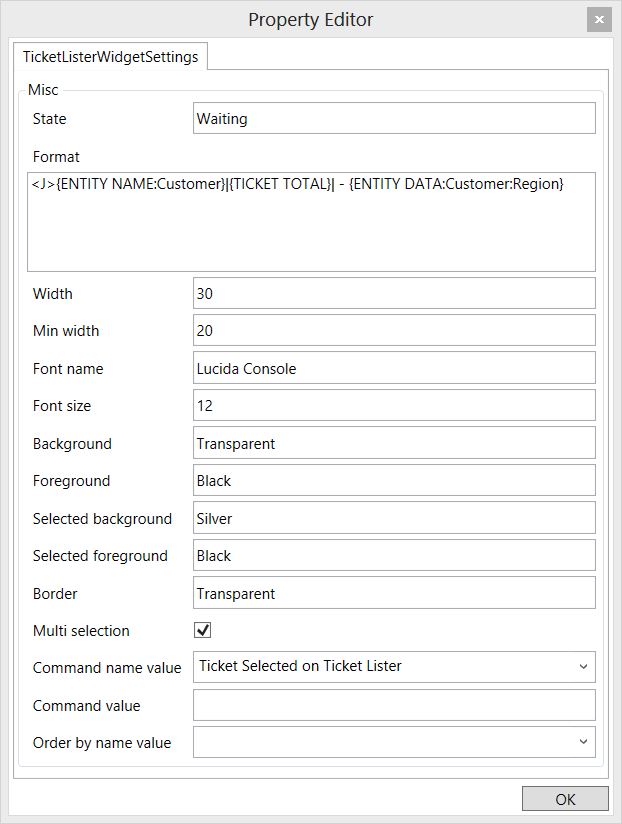
This is the settings screen of Ticket Lister 1. State is Waiting so it will display tickets with "Waiting" state. Format setting is for configuring how ticket displays on the lister. We use "Printer Template" formatting here. Most printer formatting features supported here. So you can configure how tickets displayed like you configure ticket prints. {ENTITY DATA:Customer:Region} will display Customers Region. We'll configure this field on next step.
Ticket Lister 2 displays tickets with Delivering state. Display format is a little different here. We display Deliverer name here.
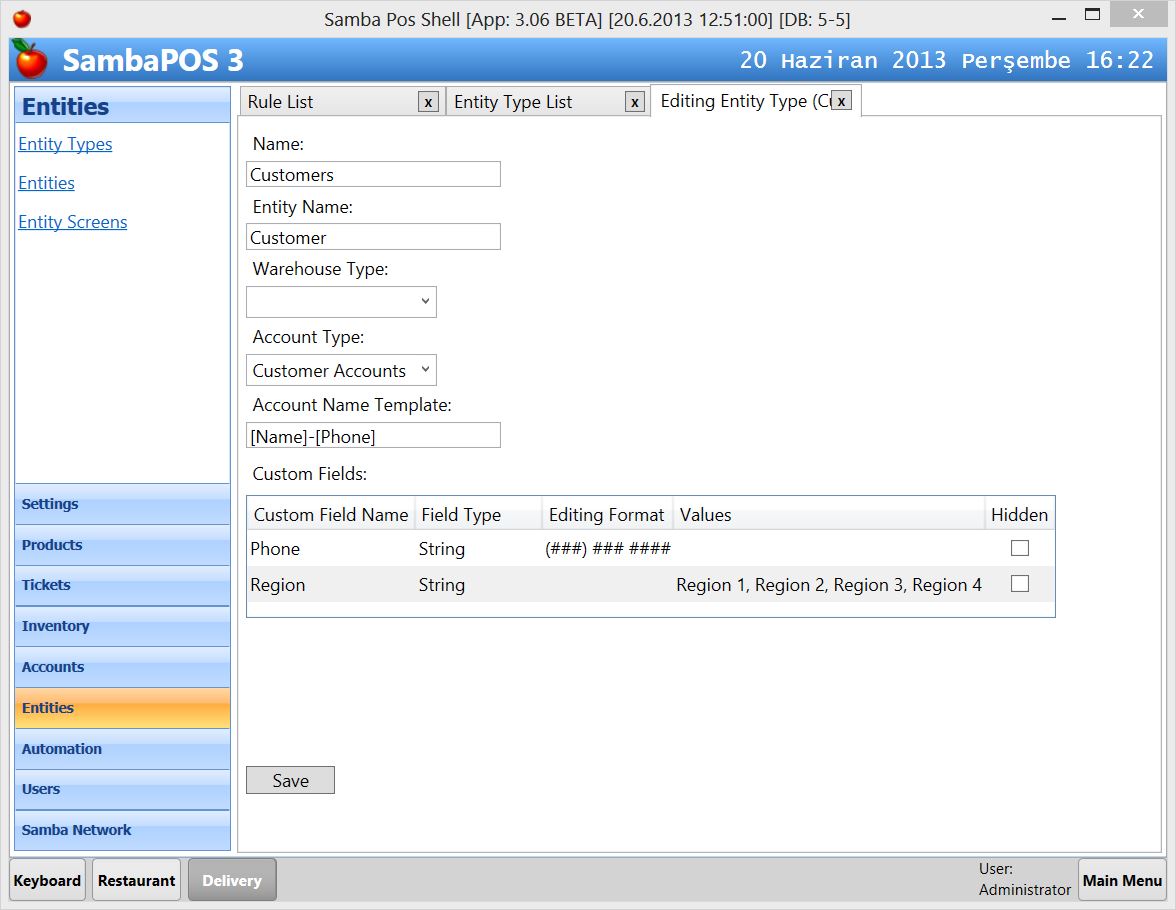
Now we'll create "Region" field for Customers. Go to Management > Entity Types > Customers and edit "Customers" entity type. You can add Region field by right clicking on the grid. I've also entered possible region values here by splitting them with commas.
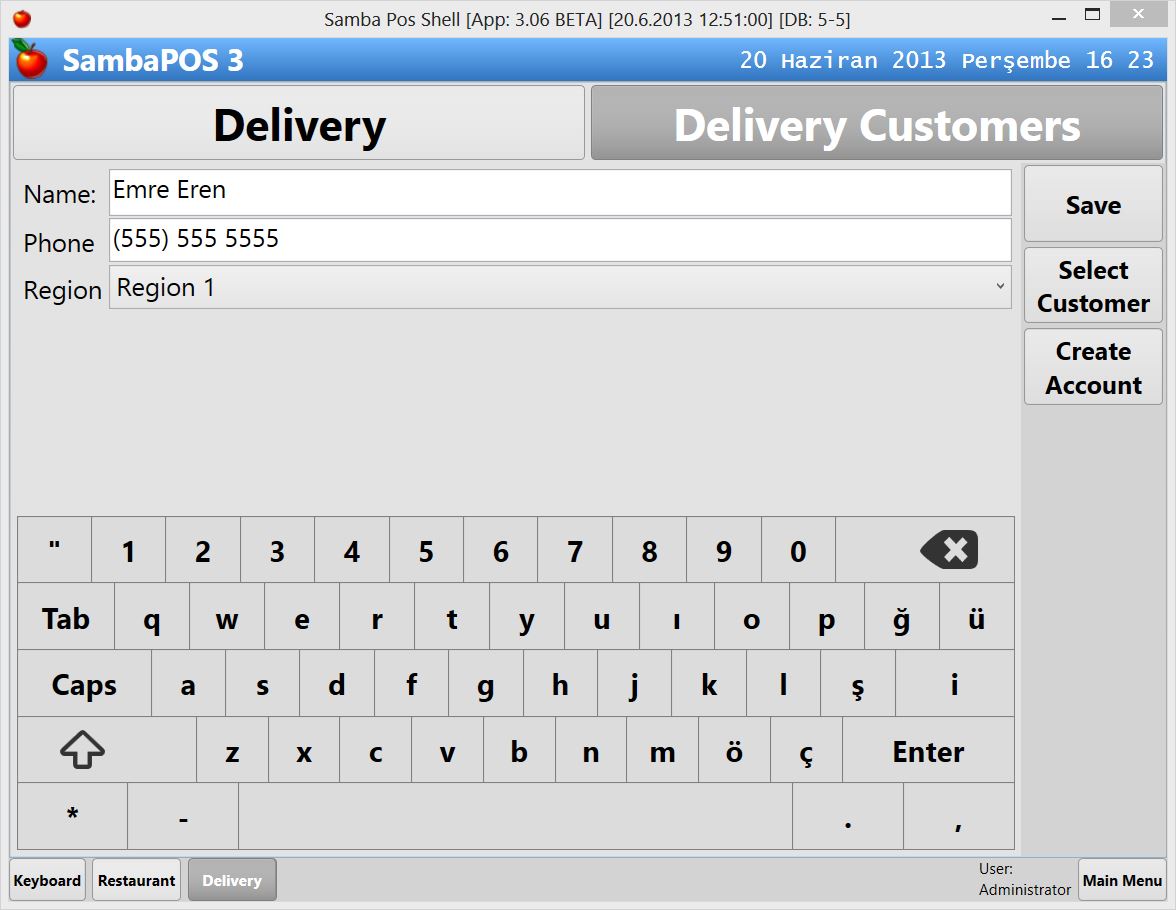
Switch to "Delivery Customers" screen and create a new customer. As you can see I can choose a region from combobox while creating a customer. We forgot adding an address field here but it will be useful if you add it too :) Click Select Customer to create an order.
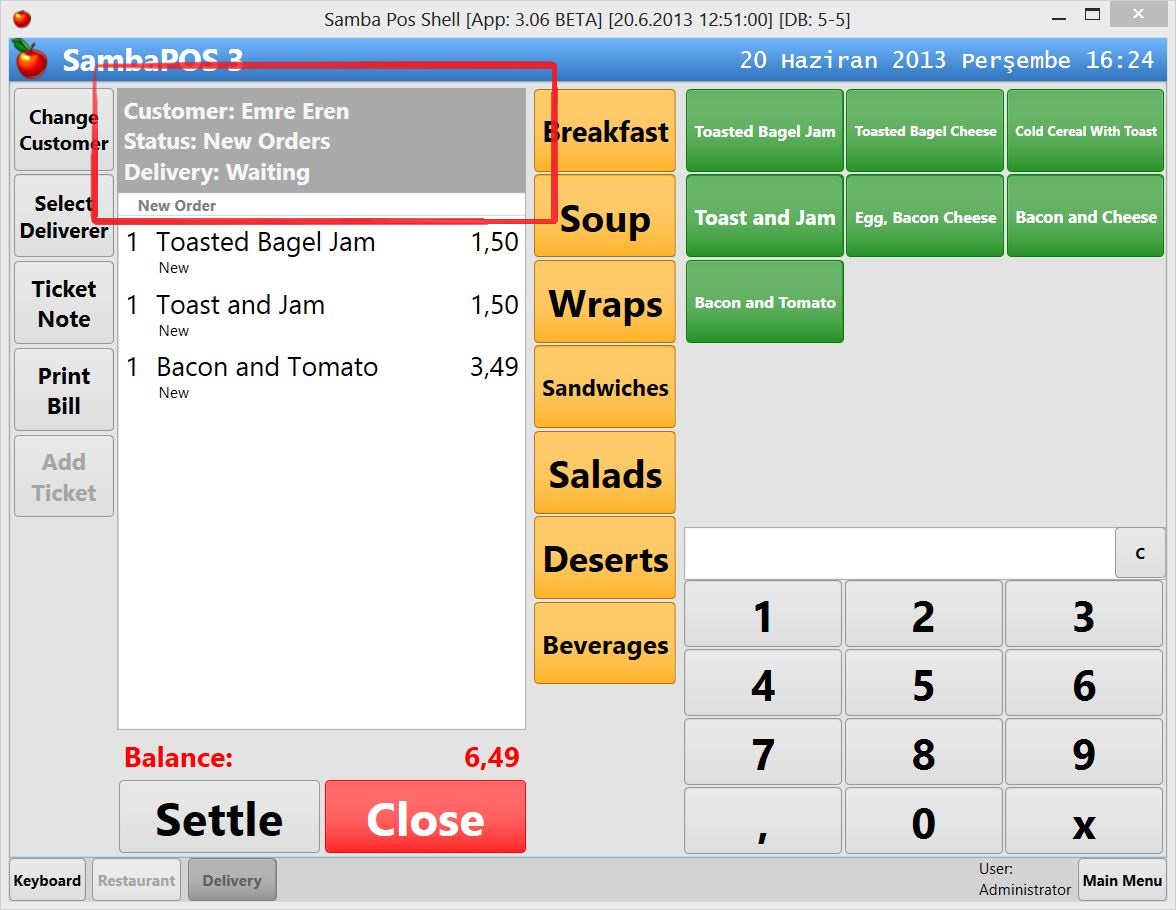
When we create an order we can see how Customer displayed on the title and the delivery status of the ticket.
When we close this ticket it should appear on ticket lister 1.
On this step we'll create some actions and rules for configuring our custom screen. We are expecting to choose tickets from Ticket Lister 1 and assign them to a delivery personnel with a single command button click. Let's start creating needed actions.
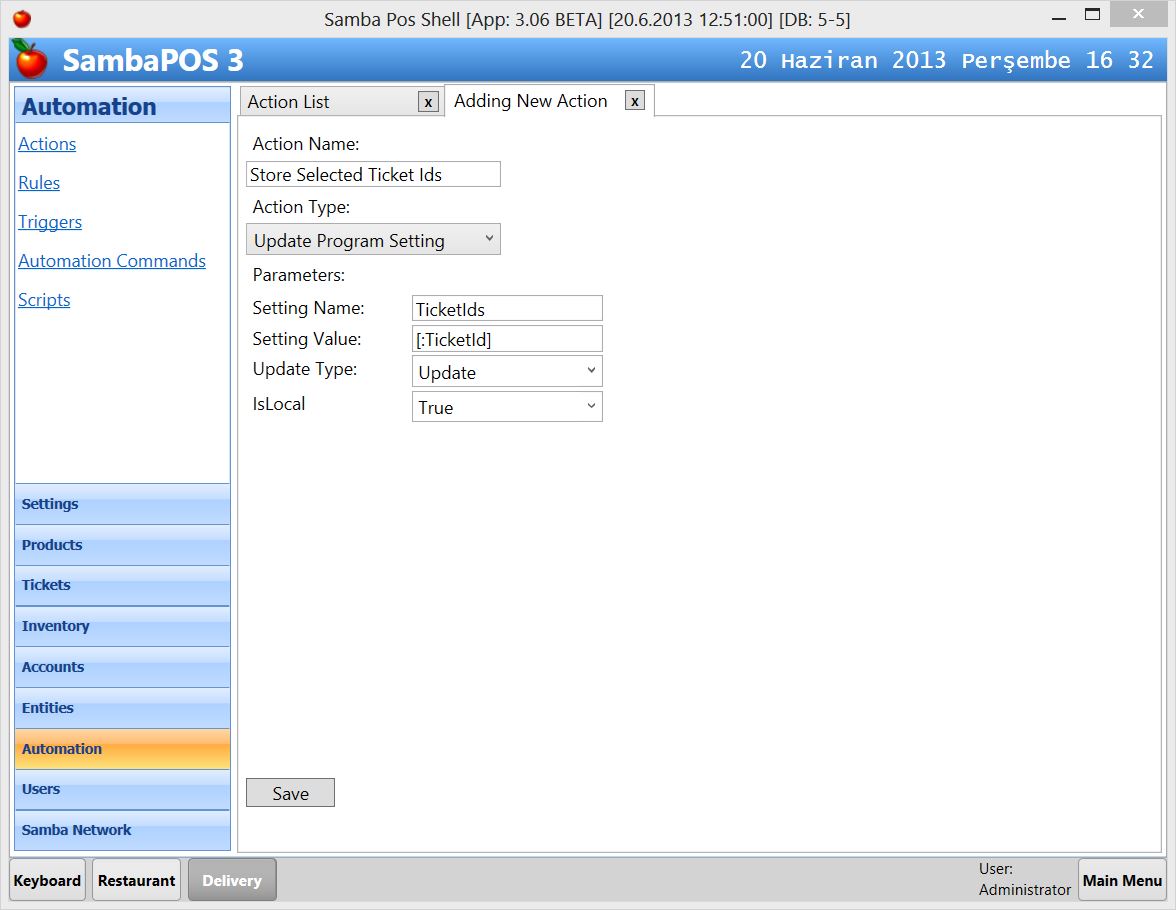
First we need to store selected Ticket Id's in program memory. This technique is useful to pass values from one widget to another. Ticket lister 1 write selected ticket ids to a program setting and when another widget needs to know which tickets are selected it will read it from this program setting.
Create a new action, select "update program setting" action type and configure it as shown here. The setting name we are using here is "TicketIds" when we need to read selected ticket ids we'll use {:TicketIds} tag.
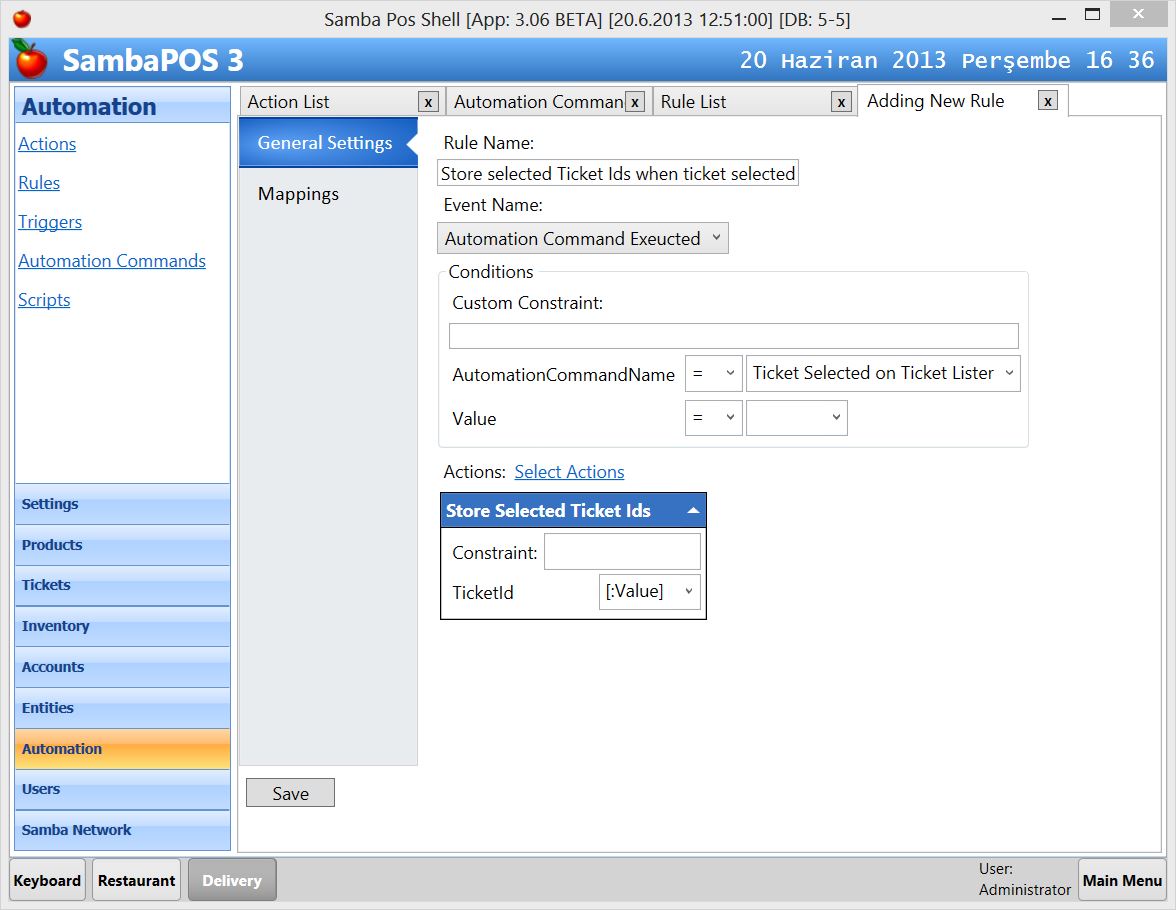
We'll need an autmation command to trigger needed rules when we click on a ticket from ticket lister 1.

Create a new rule and when this automation command triggers we'll execute "Store Selected Ticket Ids" action.
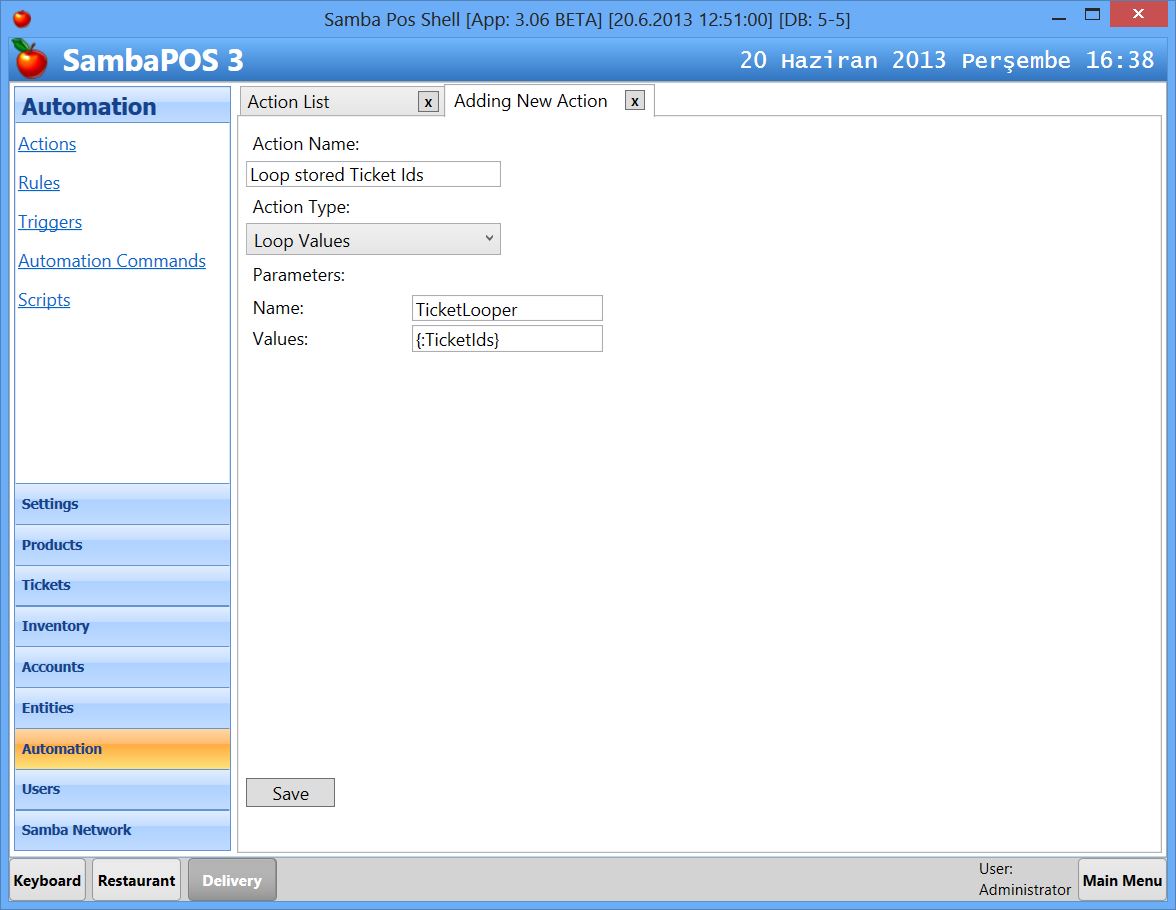
This awesome action does looping actions. It reads a value and executes "Value Looped" rule multiple times with supplied values. On this sample it reads selected Tickets Ids from {:TicketIds} tag. When we write a value in curly brackets it reads it's value from program settings. If you remember we stored selected ticket id's to TicketIds setting with "Store Selected Ticket Ids" action. It will read this setting, for example if stored ids are 101,105,109 it will split these values to three and loop these values. In this case three times.
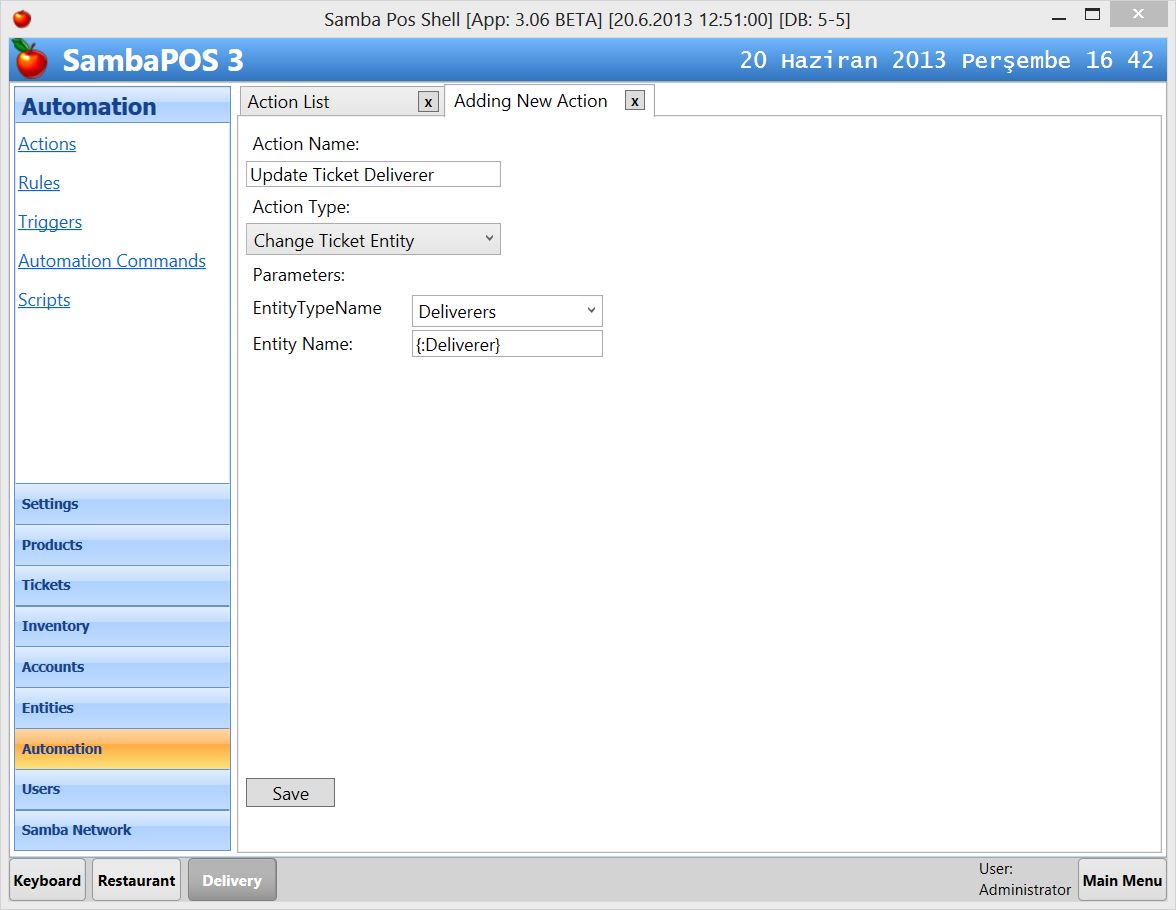
We need another action to change ticket deliverer. This action does it. Please notice this rule also reads selected deliverer name from program settings with {:Deliverer} setting name. We'll store selected deliverer name when we click Deliverer button.
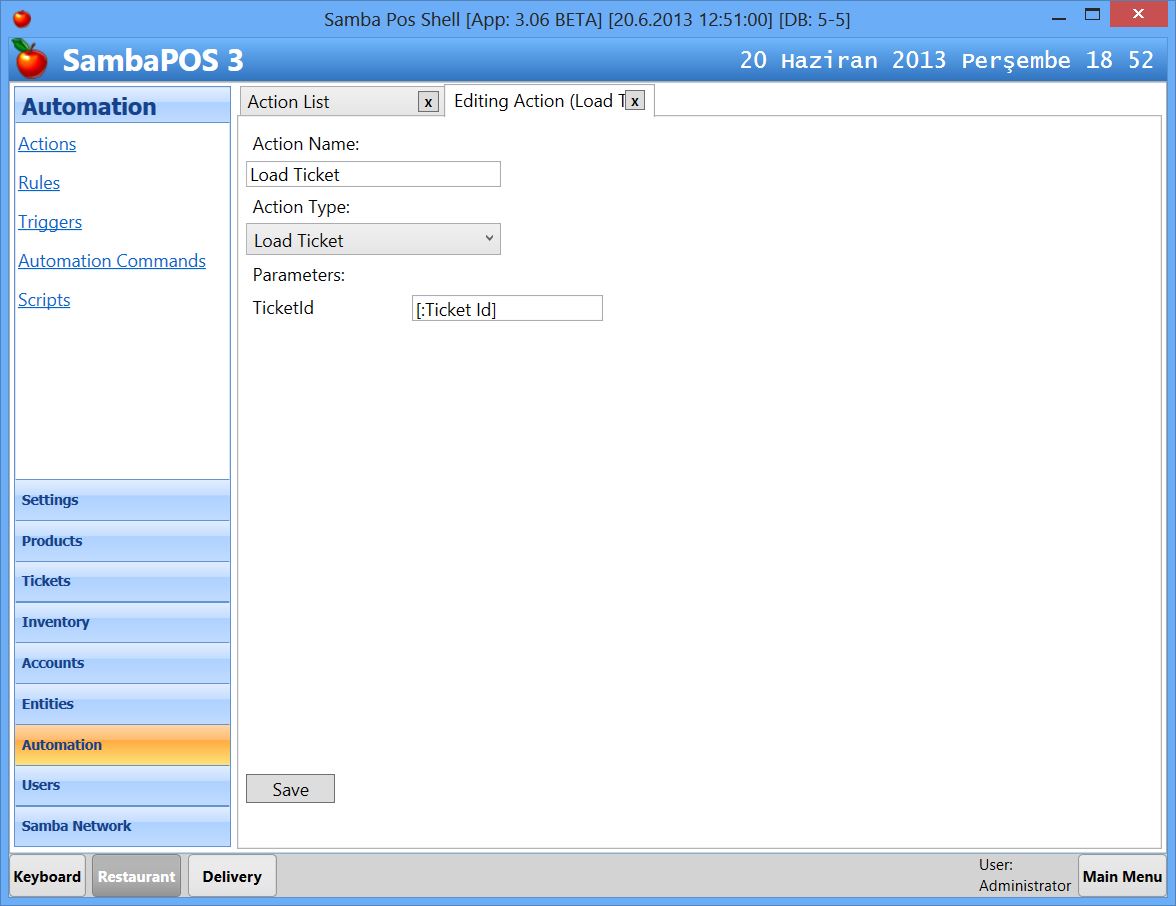
This action Loads a ticket and keeps it in memory. It is useful to use ticket related actions. For example change ticket entity action we'll use to change ticket deliverer needs an active ticket. Since there is no ticket loaded we have to load it with this action. We'll send "Ticket Id" parameter from next rule we'll create so we'll configure it as variable by typing it in square brackets.
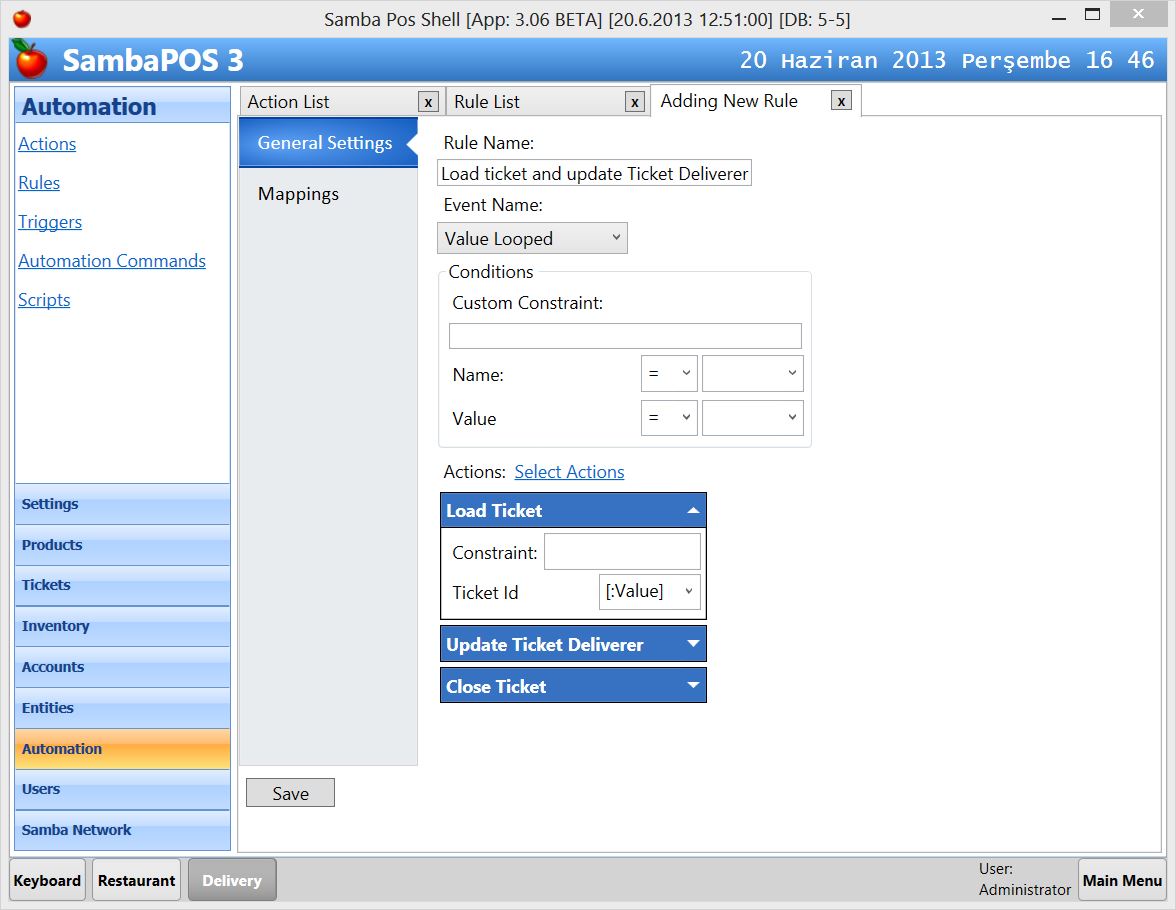
This rule is the place where all pieces used together. Like I've mentioned before "value looper" action executes "Value Looped" rule multiple times. For example if we choose 4 tickets on ticket lister 1, this rule will execute four times and on each step it will send next Ticket Id with Value parameter.
It will first load a ticket with Load Ticket action. We pass ticket id with value parameter. On next step it will change ticket's deliverer. If you remember this action reads selected deliverer from "{:Deliverer}" program setting. On the last step it closes (saves) ticket.
To be able to trigger value looper action we need to configure an automation command and map it to the deliverer button widget. Create a new automation command and configure it as shown here.

We'll create a rule to handle this automation command. When a deliverer selected we'll store deliverer name in memory and start looping stored ticket ids.

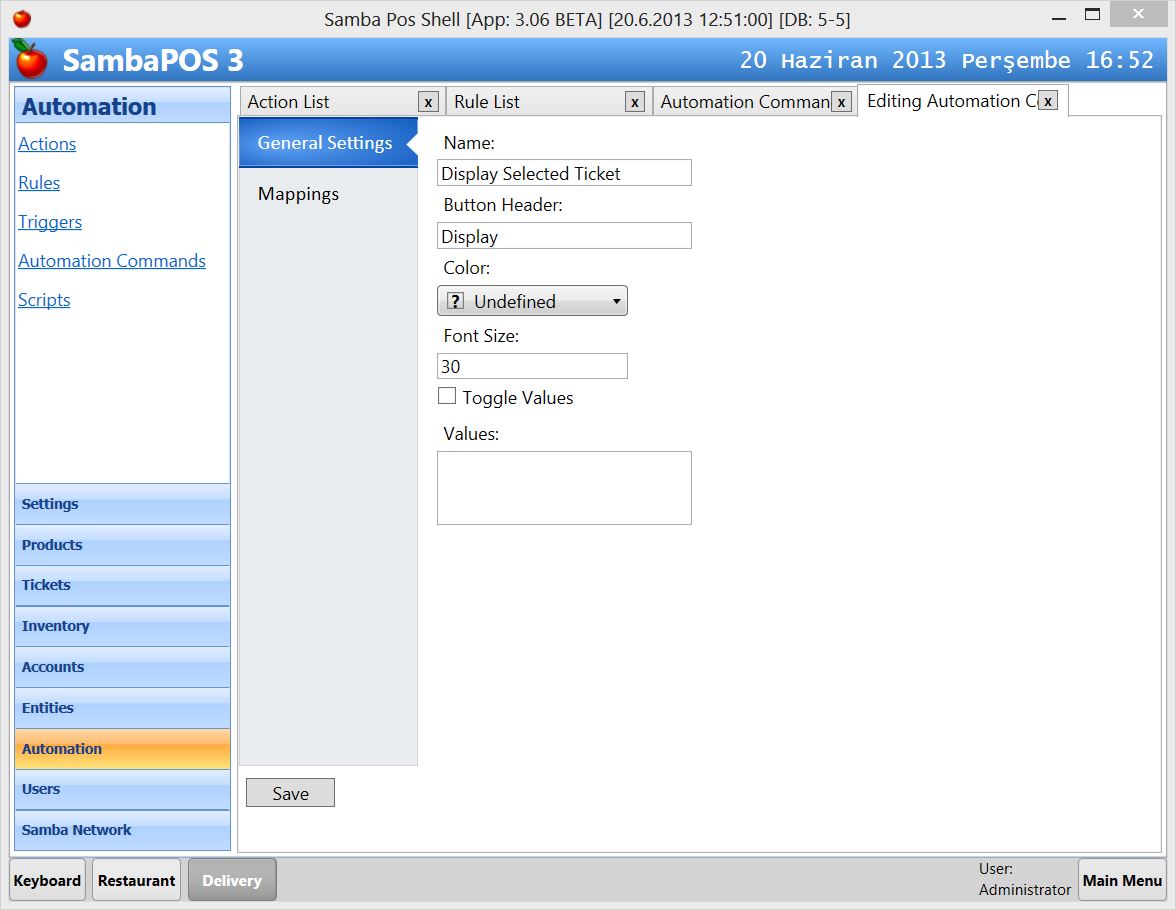
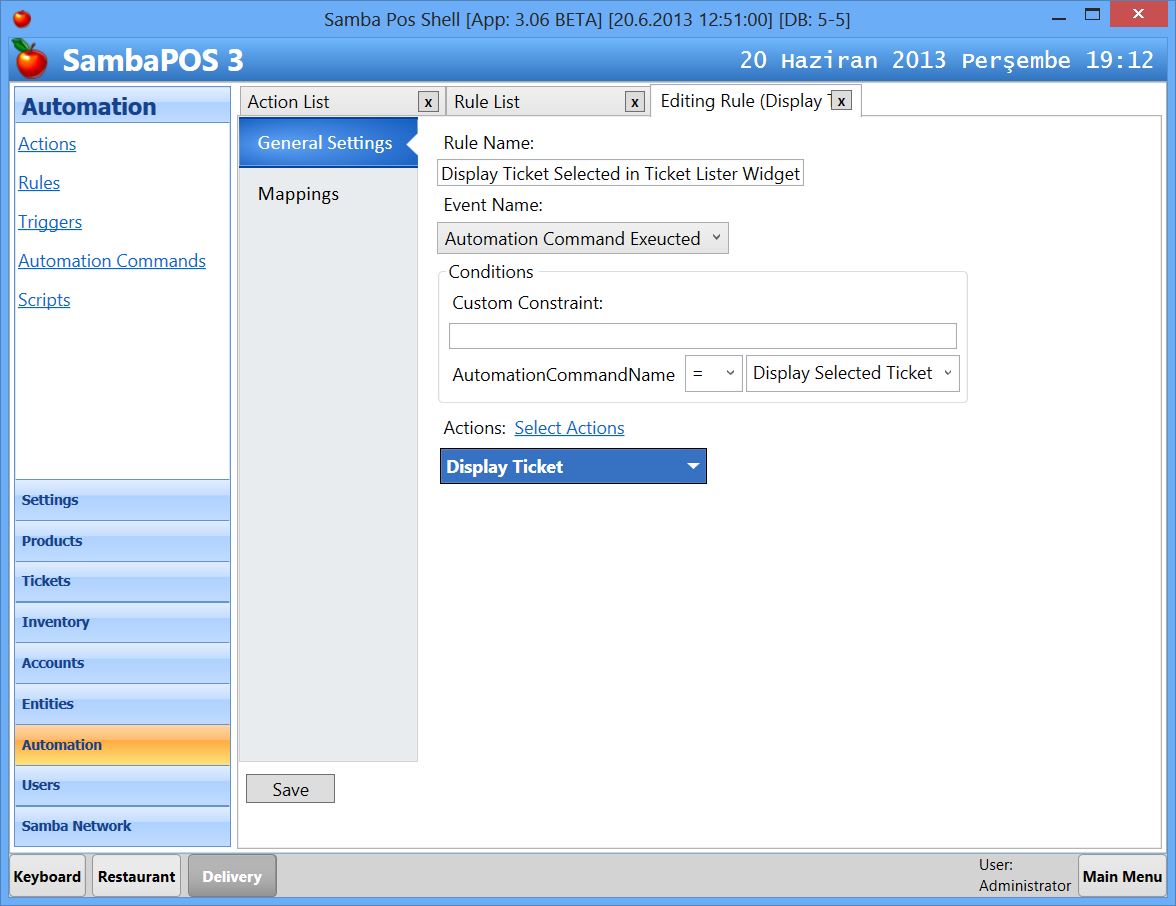
When we click on a ticket on Ticket Lister 2 we want to display this ticket. We'll handle it with Display Selected Ticket automation command. Create is as shown here. Since we call these automation commands from widgets there is no need to map these commands to buttons.
This action displays a ticket.
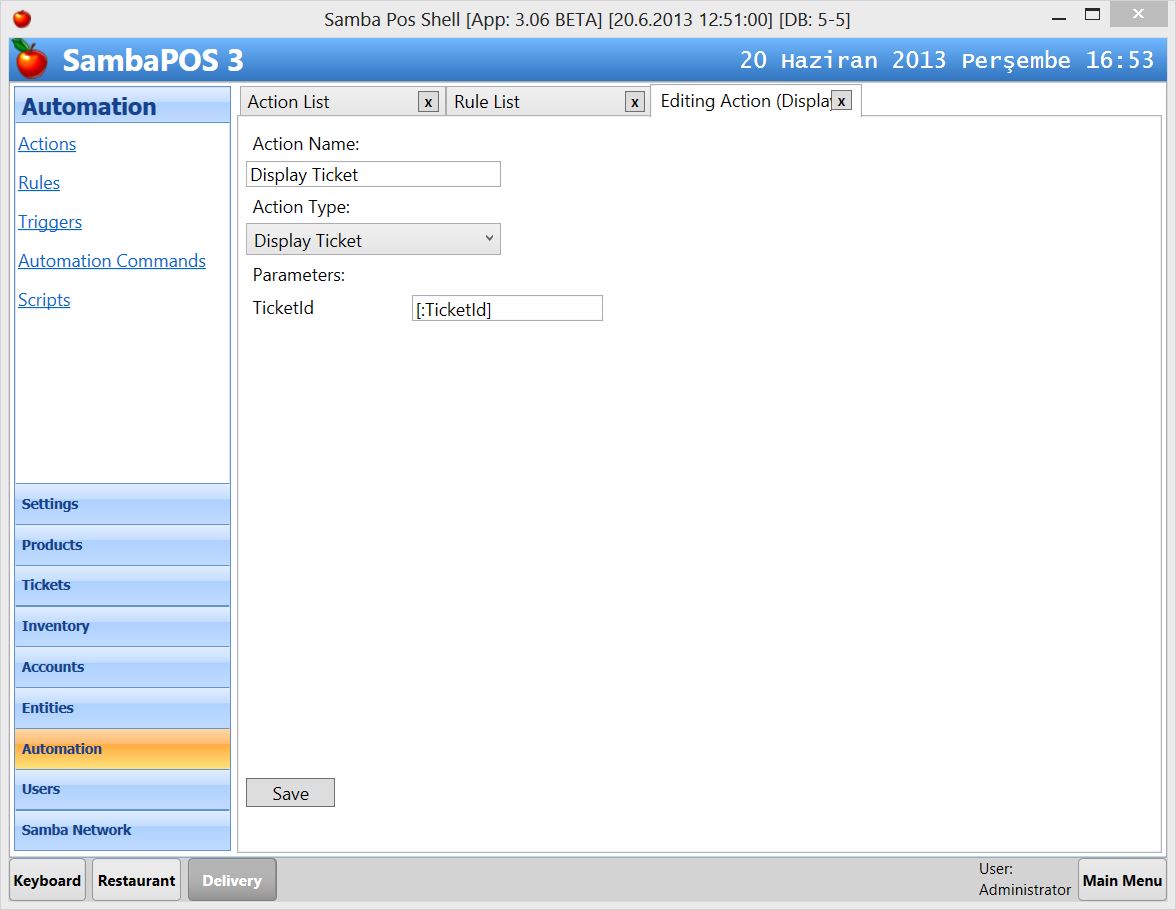
This rule handles Display Selected Ticket automation command and execute Display Ticket action. We'll map Display Ticket parameter to [:Value] too.
All required actions and rules are created. Now will map these rules to widgets. Enable Design Mode on delivery screen and open Ticket Lister 1 Settings.
We'll enable "Multi Selection" setting and Map it to "Ticket Selected on Ticket Lister" command.
When we click on a tickets there widget calls Ticket Selected on Ticket Lister command and passes Selected Ticket Ids as comma separated values. If you need to use different values you can use Command Value setting here.
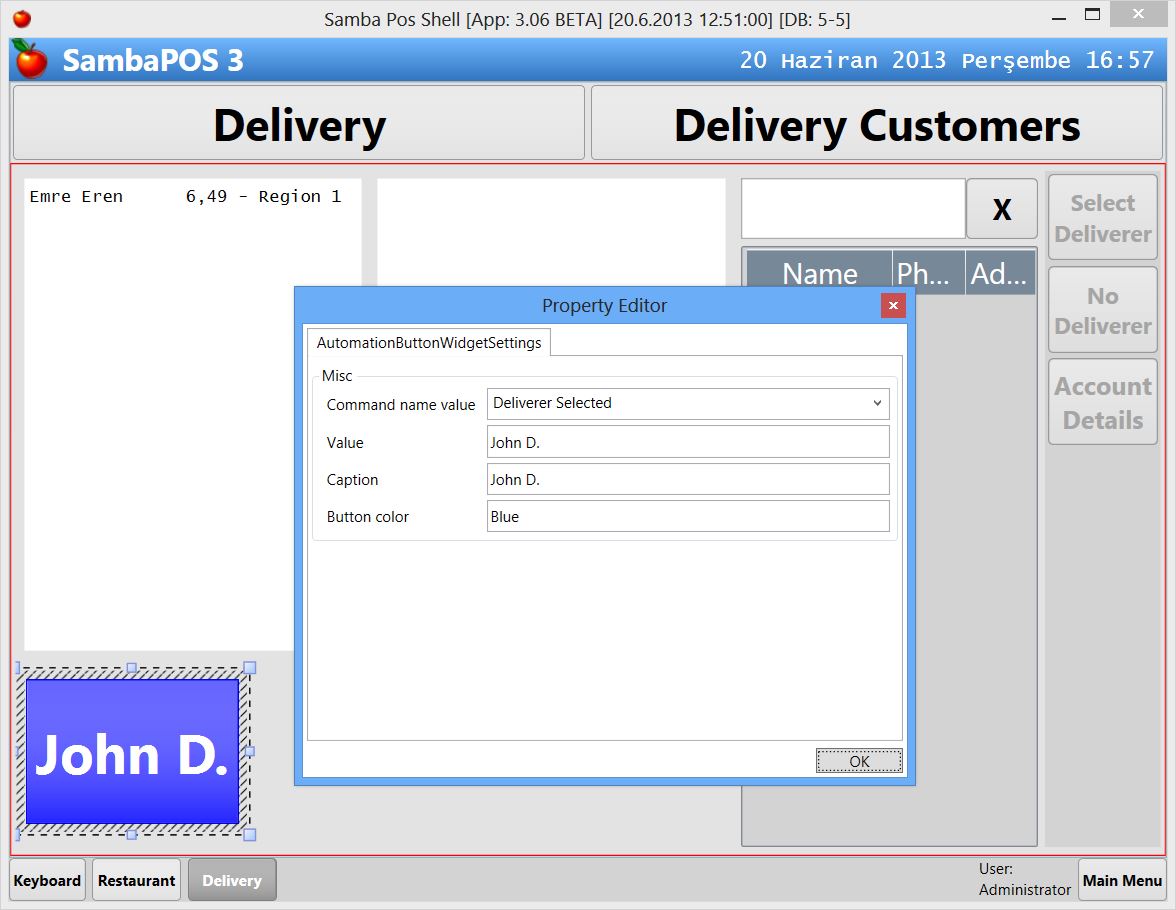
Now we'll start adding Automation Command Button widgets for each deliverer personnel and configure them as shown here. This button calls Deliverer Selected command and passes John D. as Value parameter.
We'll set Ticket Lister 2 Command Name to Display Selected Ticket. While executing this command it also passes Selected Ticket Id as value parameter.

That's all. We've created a useful delivery screen and configured it for our business needs.
It should work as shown at the sample video. Let us know your results.
Thanks.
By clicking the link below you can download sample sdf file for this configuration.
Continue Reading: Custom Package Delivery System Part 2


